Pages

Sunday, September 30, 2012

Pink on the Lips... and Cheeks!

It's the last day of September and tomorrow marks the beginning of Breast Cancer Awareness Month. I've decided to set myself a challenge to wear pink on my lips every day, whenever I'm out and about, for the month of October. Why? To raise awareness and to keep reminding people of this debilitating disease is still very much prevalent in our society.

Source: makeupfrwomen.blogspot.com
I don't want to bombard you with all the facts and figures because I necessarily agree with the ones that are commonly preached to us. This may come across as a surprise to you but (at this point) I am skeptical of mammograms. Yes, I agree that early detection is without a doubt vital but I believe that we need to develop better techniques to test for breast cancer. Both my parents are health care professionals (HCPs) and in a few years time I will be one as well. My parents have spoken with some HCPs, with their field of interest being breast cancer, who feel that women who have mammograms done annually are more likely to be diagnosed with breast cancer. We're speculating that mammograms may actually be contributing to high occurrence of breast cancer. In simple terms, it emits very high radiation, which damages cells. For a better understanding, I encourage you to read this article. This is not an airy-fairy conspiracy theory. It is backed up by studies and research.

Source: lebeautesalon.com.au
I know this goes against what cancer councils and majority of doctors say. I can tell you now that I am with the minority and I am against mammograms. My lecturer has sung praises for mammograms but I think that there is still much to be desired. Better diagnostic techniques need to be developed and this will hopefully come with more research. So in October, I am going to combine my love for beauty with my contribution to the National Breast Cancer Foundation. I am going to purchase a Pink Product, in addition to wearing pink on my lips every day. No prize for guessing which one I'm going to purchase!

Bobbi Brown's Pink Peony Set! Bobbi Brown will donate $14 for every one these sets sold.

Source: nbcf.org.au

So I guess I will actually be pink on the lips and cheeks for the month of October! 

What will you be doing for Breast Cancer Awareness Month? Do share!

Saturday, September 29, 2012

Triple S: Face of the Day #1

I was working today (and yesterday). Hence, the late Triple S post. I originally had an awesome post planned for today, which I was meant to work on yesterday but one of my colleagues has left and I had to fill her spot. So I've decided to do a quick Face of the Day post. This is my first FOTD and given that a number of people requested it during my giveaway/suggestion contest, I figured that the reaction from you guys would not be too violent or adverse.


Okay, I know that you're not supposed to put any filters for FOTD photos but I couldn't help it. I needed to do something to reduce its awfulness. The next shot is a bit blurry because it is of my reflection and I haven't cleaned my mirror in a while.


So here is a list of products that I used for my face today:

- Bobbi Brown Creamy Concealer
- Bourjois Smoky Eyes Eyeshadow Trio In Gris Lilac (the middle colour)
- Virgin, Sin and Hustle from the Urban Decay Naked Palette
- Rimmel Scandaleyes Mascara
- Bobbi Brown Blush in Tawny
- Benefit Watts Up Highlighter
- Clinique Superbalm Moisturising Gloss in Grapefruit

What do you think of my FOTD post? Should I continue writing this type of posts?

Thursday, September 27, 2012

Dear Ty: Makeup Storage and Organisation

As I mentioned in my last Triple S post, I said I will be responding to Jenny's "Dear Ty" request. I'm finally posting it up! I really hope it is what Jenny's after and lives up to her expectations. Fingers crossed! Before I begin, have a read of her "request letter".

"Dear Ty,

Jenny has been diagnosed with a severe case of Organised-Makeup-Phobia. As a result, her cosmetic collection is absolutely chaos, causing her to be late to work each morning, as she conducts fruitless searches into her drawers of makeup for the right product. This has also means that she only has about 5 products on regular rotation, leaving many makeup items sad and unloved.

As a result, the doctor has prescribed her with a ‘Makeup Collection, Storage and Vanity’ post on Ty’s Blog of Epiphanies. She would particularly love to see how Ty stores her larger eyeshadow palettes, particularly her Urban Decay and Bobbi Brown. Jenny also enjoys salivating over picture-heavy posts with neatly organized make-up sitting comfortably in their trays. And, seeing the amount of covetable products Ty owns, this would be Ty-Dy-For!

Can’t wait to see your post, after all, it’s just what the Doctor prescribed!

Love,

Jenny’s Fingers (currently tapping away on keyboard).
"

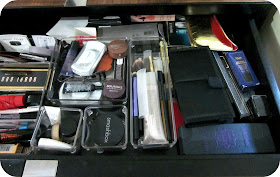
Thanks to Jenny, I've finally cleaned up my drawer to fulfil her request. Before the clean-up, this is what my makeup drawer looked like:


Yes, very unsightly, I know... Here's a fun fact about me: I am a product box hoarder. Wait, huh? What does that mean? It means that instead of throwing out the boxes my makeup items come in, I keep them. But why? Because they are either too pretty for me to chuck out or because I had this notion that I would one day need to read the ingredients list or some information on the box would come in handy.


 I've finally forced myself to clear all of the boxes out of my drawer and thrown them into the recycling bin. I mean really, most products have their ingredients listed on the product anyway. Plus, it's not like I'm going to research every little ingredient or be copying all of them down. I have too little time for that. So, I decided to let these boxes go, even the pretty ones. It's sad but liberating at the same time.

I then proceeded to reorganising my makeup items.


As you can see, I store most of my makeup in plastic trays/containers. I found them at Big W and each one is around the $15 mark, depending on the size of the container. I have divided my makeup more or less into "sections". I grouped all of my eyeshadows, mascaras and eye pencils, lip products and face products into different compartments/sections.

In the upper most compartment of my tray, I have my Naked palette and three other small eyeshadow palettes. The next horizontal strip of compartment below it holds my Bobbi Brown palette (its the only item with a box that I am keeping), a couple of Bourjois single eyeshadows, my Bobbi Brown blush and concealer, a Benefit Eye Bright Pencil and a Revlon Smoky Shadow Stick.

The compartment below that holds all of my eye pencils and mascaras. And in the compartment below that, I have all of my lipsticks, lip glosses and lip liners. On the left hand side, in the vertical compartment, is my miscellaneous section. It contains items such as the Urban Decay Primer Potion, a couple of eye pencil sharperners and Lucas' Papaw Ointment. So you can say that this is my prep and prime section. I find that by grouping products based on their categories, it is easier and faster to find the items. For example, there's no way your MAC lipstick will be in the mascara section. This cuts down the searching time. And if you are in a hurry in the morning, you know that you can randomly grab something off each compartment and you know it will contain a product each from a different category, to make up your whole face.


Moving on to the next set of containers... In the large square container at the top, I've got all of my eyelashes buried at the bottom because I know that I only use it occasionally. My eyelash curler is of course at the top, where it is easily accessible. I also have my bronzer and tinted moisturiser at the surface. The small square container on the bottom left holds most of my sample sized products (that I hardly use, oops!). The one of the right keeps my transculent powder and a couple of hair bands snug. Lastly, the vertical tray on the right houses all of my makeup brushes.


Beyond that last tray, I store all of the bulky items that I don't or rarely use. The gold bag at the top contains the Estee Lauder lipglosses that I ruined (they are still useable but I seldom reach for them). Jenny also mentioned that she only uses a handful of products over and over. From what she said, I've deduced that she does not have a lot of time in the morning to put on her makeup before she goes to work. I could be wrong but here are my tips (because I too am in a hurry in the morning).

- Plan your makeup the night before just like how you would plan your outfit. I know it sounds vain but you will always have time to think about stuff like that before you drift off to sleep. So plan your makeup look in your head. That way you're already geared for certains items and will not waste time pondering what products to use and how to use them. This also means that you will get to use all of your makeup products.

- If you take the bus to work, pop a couple of your makeup items into your bag to apply on the way. I've seen ladies do full face makeup on the bus before. It's no easy feat but you make use of the travelling time. My advice is, take lip (like lipstick and lipgloss) and pressed powder products (like blush and bronzer) with you. I get motion sickness when I apply eye products because it requires a lot of careful application and takes a lot of time, staring into a mirror. Plus, you don't want anything near your eye in a moving vehicle, you might poke your own eye out!

- If you drive to work, apply your lip and cheek products when you get to work. You can pop into the bathroom and do it quickly. I've dashed into the bathroom to apply my makeup before I started work, on the a number of occasions. Or do it quickly at your desk before you start working (only if you are allowed to do so).

What do you think of this post? Is it of any help? Do you have any makeup storage tips? Do share!

Wednesday, September 26, 2012

Wicked Wednesday: My Alpha-H Skin Care Routine & Review

During my most recent giveaway/contest, a number of you submitted suggestions that I do a post on my skin care routine. Today, I've decided that I'll fulfil those requests. I'm calling it my Alpha-H Skin Care Routine because for the past month, my skin care products, funnily enough, are from Alpha-H.


So essentially, I will be reviewing the three Alpha-H products that I am currently using religiously. At the same time, I will be giving you a quick rundown on how I use these products. First, let's begin with the Alpha-H product that I've been using the longest, their Gentle Daily Exfoliant.


Alpha-H Gentle Daily Exfoliant 
Claims: The exfoliation, is not abrasive, but still effortlessly removes dead and damaged skin cells, sweeps out congested pores and blackheads, reduces inflammation and uneven pigmentation, boosts moisture retention and creates a soft light-reflecting sheen across the complexion to reduce the appearance of fine lines, wrinkles and sun damage.
Retail: AUD$59.95 for 50g
Packaging: 4 out of 5
Review: This truly is a gentle exfoliant. It comes in powder form and you use it by pouring some into very wet hands, mixing it into a paste with your fingers and rubbing it onto your face for a minute before washing it off. Although it says to use 2 measured cups of the product, I have yet to figure out how to get 2 measure cups with the bottle. That's the only reason I am giving this packaging a rating 4 out of 5 instead of 5 out of 5. Forget about those microbeaded scrubs! You can achieve soft clean skin with this product and it's non-abrasive. Although it says you can use it daily, I only use this exfoliant once a week because too much exfoliation can be a bad thing. Also, I use a couple of products that contain glycolic acid, which also do the job of exfoliating my skin. I love using this product, particularly after wearing heavy makeup. It feels like my pores are truly unclogged and cleaned out. This product at $60 may seem expensive but I believe that it will last you a very long time, especially if you only use it once a week like I do. 


Alpha-H Balancing Cleanser with Aloe Vera 
Claims: The non-greasy, gently fragranced lotion delicately cleanses without drying or irritating the skin. It thoroughly removes both face and eye make-up and at the same time leaves the skin pH balanced.
Retail: AUD$42 for 200mL
Packaging: 4.5 out of 5
Review: I was using my trusty Cetaphil cleanser previously before I started using this one. I stopped using Cetaphil because I had a massive bout of breakouts and I thought it wasn't doing much help to my skin. Out of desperation, I started using this cleanser in hopes of restoring my skin. I found myself falling in love with it. Now, I can definitely see why people, like British model Ruth Crilly, rave about this product. You do not need a lot of this product to cleanse your face, unless you are using it to remove your makeup as well. In which case, it saves you a lot of time because it combines the makeup removal step and cleansing step into one. It feels very soft and gentle and does not dry the skin out. This product contains aloe vera, which is a great bonus. It contains vitamins such as A, C, E which are powerful antioxidants that reduce cell damage from free radicals. It also has anti-inflammatory properties, which can also explain why this product does not induce irritation in the skin. My bottle of cleanser if the travel size version. So if you buy the full one, I can tell you that you'll be getting your money's worth because it is a fairly large tube and it should last you a while. 


Alpha-H Balancing Moisturiser and Gentle Exfoliant 
Claims: Hydrates and revitalizes ageing, damaged skin. Works on collagen and elastin fibres and reduces acne and scarring.
Retail: AUD$72 for 100mL
Packaging: 4 out of 5
Review: I am not as certain about this product as I am about the other two. I really like it so far but I haven't used to long enough to reap all the benefits that it claims it will deliver. This is currently my daytime moisturiser. I like how it feels light on the skin. It is somewhat fluid so it glides onto your skin easily. That has a down side to it. It's easy to accidentally squirt out too much product from the tube. If they make the packaging into a bottle with a pump, I will definitely rate it a 5 out of 5. This product makes my skin smooth and soft. It produces a slightly dewy effect, giving your skin a subtle youthful glow. I also like how it is exfoliating my skin as well as moisturising it, keeping my skin care regime short and simple. I am hoping that as I use more of this product, it will fade all of my acne scars and reduce the occurrence of pimples. I also got this product in a travel size version. I think that considering it is a high quality product and it does multiple task, it is well worth the price.

Alpha-H is an Australian company and its products are made in Australia. I am proud to support them and I will most likely be repurchasing these products once they run out. For a list of stockists, click here.

What skin care products do you use? Do share. If you have any questions about my skin care routine, feel free to leave them in the comments section below.

Saturday, September 22, 2012

Triple S: "Dear Ty" Beauty Advice Column

everythingbobbi.com
Hey ladies, hope you're all having a great weekend. I'm looking at starting an Advice Column/Segment here on my blog. This is based off the idea Saziya submitted. Here's what I have planned:
  • You can write to me and ask my questions about beauty. It can be about other stuff too; like art, school/university, anything you like! 
  • I will answer your questions and some will be in the form of an advice (depending on your questions). 
  • I will answer to the best of my knowledge and abilities and try to do as much research as I can for you. 
  • Your "Dear Ty" email can be in the form of a request, for example, you can ask me to do a particular makeup tutorial if you like. 
The first "Dear Ty" question/request I am going to be answering is none other than Jenny's. So keep an eye out for the post! It will be up in a couple of days. Fingers crossed it will be what Jenny is after! 

I would like to know what you guys think. Is this of some interest to you? If so, you can start composing your "Dear Ty" letter and email it to me at ty.blog.epi@gmail.com! Please feel free to vote in the poll on the top right hand corner of this blog.


Wednesday, September 19, 2012

Wicked Wednesday: Benefit Beauty School Lesson Two

Ladies, if you liked Benefit's How to Look the Best at Everything complexion kit (Lesson One of Benefit Beauty School), get excited! The kit for Lesson Two is about to be released!


I've been wanting a Benefit blush for a long time now. I think this will be the perfect opportunity to grab one by getting one of these kits. Why am I so excited? It is four of Benefit's amazing lip and cheek products in one box for $60; we'll be getting more bang for our buck! I can never resist a good deal. You can bet your bottom dollar that I will be popping by a Benefit counter to check these babies out next week. I have my eyes on the Feelin' Dandy kit!

Note: this is NOT a sponsored post. I am sharing this inside knowledge with my own free will because I am genuinely excited about it!

Which one of these kits would you go for? 

Saturday, September 15, 2012

Triple S: Dramatic Navy Eye Makeup Tutorial

If you've read my post on Beauty on Pinterest, you'd remember how much I love this photo. So much so that it has inspired me to come up with a navy eye makeup look!

Pinterest.com

So here is the look I came up with! I would like to call this Pinspiration Look #1. (P.S. #2 is on its way.)


If you would like to see how I achieved it, just keep reading...


Step 1.  Cut out a strip of magic tape and tape it onto the edge of your eyes at an angle (pointing towards the end of your eyebrows). This will give your eye makeup a nice clean edge. Proceed to filling in your brows if you need to. My brows are horrendously thick and natural-looking, so I didn't fill them in. If I did, it would look horrible.

Step 2. Colour in your lids with a navy eye pencil, stopping just beneath your crease. Make sure you go right up to the edge of the tape. Here I've used my Bobbi Brown's Long Wear Eye Pencil in Black Navy. It is perfect for this look because it's very pigmented and long wearing. It has a slightly creamy consistency so it goes on smoothly. It's a lot easier and faster than slowly packing on lots of powder eyeshadow.

Step 3. Pick up some Naked eyeshadow from the Naked Palette with a fluffy blending brush and blend this into your crease. This will also blend out the top edge of the navy eye pencil to soften up the look.

Step 4. Unfortunately, I forgot to take a photo for this step. What I did was remove the tape, and using my Bobbi Brown navy eye pencil again, I lined the outer half of my lower lash line with it. I also drew the colour up to join with the top. 

Step 5. With a small flat brush, pat some glittery light sliver eyeshadow onto the centre of your lids. Don't bring it too far up; we don't want any on the crease. The silver glitter will help make the navy colour pop. I used Bobbi Brown's Rockstar Metallic Eyeshadow.


Step 6. Using a black pencil eyeliner, line your top lash line and your top and bottom waterline. It does not have to be perfect, you can just smudge it on with short strokes. Don't make the line on your top lash line too thick. We want the main feature to be the navy colour.

Step 7. Line the (remaining) inner half of your lower lash line with some dark glittery silver eyeshadow. I used Bobbi Brown's Gunmental Shimmer Wash Eyeshadow.

Step 8. Place some of the glittery light sliver eyeshadow onto the inner corners of your eyes to brighten the area. You can also use Virgin from the Naked Palette. I highlighted my brow arch with Virgin as well.

Step 9. Curl your eyelashes. I used my relatively new Shiseido eyelash curler.

Step 10. Load up your lashes with your favourite mascara. I used Rimmel's Scandaleyes mascara in Extreme Black.


Step 11. This step is optional. I put on a set of MAC #32 false eyelashes to make my lashes look as full as possible. They look wonky now because I did not know how to take care of them.


Step 12. Now for the face, put on your favourite foundation/tinted moisturiser. I used my Laura Mercier Tinted Moisturiser.


Step 13. Conceal any blemishes. As you can see, I have tons! My skin is not in its best shape at the moment.


Step 14. Powder your face, especially your T-zone which can get quite oily. I used my Smashbox Translucent Powder.


Step 15. Apply blush to your cheeks lightly. We do not want it to compete with the eye makeup. Choose a more natural browny pink colour. I used my Bobbi Brown Blush in Tawny. First I sculpted my cheeks with it, then I applied some to the apples of my cheeks.


Step 16. Line and fill in your lips with a nude lipliner. You may slick on a matching nude lipstick on top if you like.


Step 17. Apply some pink lipgloss to bring some colour back into your lips, to avoid looking like a corpse!


And there you have it! The completed look.


I also put my hair up into a top bun and wore some silver and navy earrings (to look more like the lady in the picture). I took a lot of photos for this look because I really loved it! It looks really nice in real life. Too bad I don't have a great camera to show its true beauty! But feel free to go through the photo gallery that I've compiled.


What do you think of this look? Love it or hate it?

Wednesday, September 12, 2012

Wicked Wednesday: DIY Knotted Crop Top Tutorial

Okay, so I saw this tutorial on dropdeadgorgeousdaily.com and I thought it was very clever of the creator. I absolutely love the look of the top she "revamped". I didn't completely understand the instructions and the step-by-step photos were quite small (no offence to the person who posted it!). But I got the gist of it and wanted to give it a go. I took photos throughout the process and thought that I could make an even better version of the tutorial.

dropdeadgorgeousdaily.com

First, you need an old tank top/singlet (preferably of a stretchy material) and a pair of sewing scissors. A friend gave me this blue top and it is one size too large for me, so I thought this would be the perfect way to make it fun and wearable.


 Step 1. Hang your top up against a flat surface so that it is easier to work with.


Step 2. Grab your scissors and start snipping away! You want to make the bottom half of your top into a fringe. I find the easiest way is to start with the middle, cutting the bottom half of your top into half. Then, take one side and halve it again. Keep halving the strips until you get them to a width that you like. The smaller the strips, the more knots per row.


Here's one way to do it. Grab a thick strip, fold it down or away from you into half. With two/three fingers holding the ends (to keep it as a fold), insert one scissor leg into the slit/hole and cut upwards.


When you're done cutting and snipping, you will end up with a fringe top.


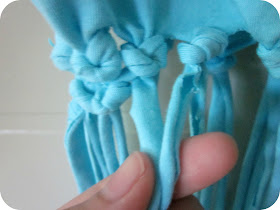
Step 3. Now, become sailors and make some knots! Grab two strips that are adjacent to each other and loop it. Then bring the tail behind and pull it up through the loop to make your knot. Keep doing this until all of the strands are knotted: there you have your first row. 


Step 4. When starting the second row, make sure you grab two strands, each coming from a different knot (but that are next to each other). Repeat Step 3 to make your second row.


Step 5. You may tug at the knots to make the top looser if it is starting to get tight and narrow. Repeats Step 3 and 4 to get the third and fourth rows.


Step 6. I got tired of standing to at around the third row, I moved to a table and chair. I lay the top down on the table and continued knotting (yes, it can be done!). I did up to 6 rows but I should have stopped at 4 like the creator did. Why? Because the fit was so tight that I could barely put my head through to start with. My advise is, don't pull your knots so high and tight, it'll be easier to wear.


Step 7. When you are done with your last row, cut off the tails.


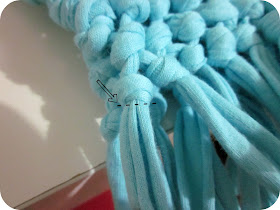
There you have it, your very own handmade Knotted Crop Top. I took a photo of it before I tried it on. Like I said, it was a struggle to put the top on because of the narrowing. I ended up cutting away one row. Below is a close-up of the knotted design. 


What do you think? Will you give this a go?

Sunday, September 9, 2012

Mini Blog Sale

Hey ladies, I have two items that I would like to sell. No, I did not buy these online and reselling them to make a profit or anything like that. I'm just a bit short on cash at the moment (from all my reckless spending). I won't be charging postage unless you want it to be registered. I will only sell these items to Australian residents.

Estee Lauder Idealist Even Skintone Illuminator
AUD90 (unopened)


Napoleon Perdis Hollywood Bombshell Palette
AUD38 (unopened)

Please contact me through email: ty.blog.epi[at]gmail.com if you are interested in buying. You may negotiate the price but I can't promise you a drastic change.

Hope you're all having a good Sunday!

Saturday, September 8, 2012

Triple S: Revlon Colorburst Lip Butter in Lollipop Review + Swatch

Hope everyone is having a lovely weekend! I still have a pretty big uni workload but I promise I am also working on the posts that I've been promissing you guys! I thought it'd be a good idea to post up a review of my Revlon ColorBurst Lip Butter in Lollipop in the mean time.

I know there is an abundance of Lip Butter reviews on the internet but I thought that giving my two cents worth is never harmful.


Claims: Softening, smoothing and hydrating lip product that boosts moisture levels
Retail: AUD$21.95
Packaging: 4 out of 5
Review: I think that if a lipstick and a lip balm were to get together, the lip butter would be their baby. The Revlon's lip butter is as pigmented as a lipstick but as moisturising as a lip balm. What more can you ask for?! Okay, maybe there is one thing we can ask for: a slightly cheaper price. But hey, I'm not complaining, I bought this at a sale. So I'm just going to wait for another sale before I get my hands on more of these babies (no pun intended)!


If you can recall from my rave of this product in my Emily Blunt Makeup Tutorial post, you'd remember how much I love the colour! Let's not forget that colour and description is very relative but anyway, in my eyes, Lollipop is the perfect pinky fuchsia colour! I think that this product has lived up to its hype. For a person who doesn't wear makeup everyday, I find myself slicking some of this stuff on whenever I am at uni. It makes me feel instantly prettier. It never dries my lips up like most lipsticks do, so that is definitely a big plus for me.

The only reason I gave the pakaging a 4 out of 5 is because it's relatively easy to clip the lip butter with the rim of the cap (when one does not take care when capping it). I was a bit annoyed when I did it the other day but I guess it's mainly my fault for not being careful. That aside, overall, I think this product is pretty perfect.
Here is the swatch. 

With sunlight
As you can see the product is somewhat reflective because of the shimmer it contains and of its balmy nature. However, fear not! I think that the amount of glitter flecks they put in this product is enough to give you a beautiful glossy-looking lip but not so much such that you look like a sparkling vampire!

In the shade

I know it looks sheer on my hand but it looks quite opaque on my lips. The colour is "buildable" so you can choose to give yourself a soft stained look or a fully made up pout.


Do you like Revlon's ColorBurst Lip Butters? Which colour(s) do you own? Do share!