I know my tutorials usually have lots of step-by-step photos. Today, I've decided to try something different. Something simpler. Do let me know what you think.
1. Apply Virgin (from the Naked Palette) all over your eyelids, particularly on your inner corners and your mobile lid.
2. Mix Naked and Buck (from the Naked Palette) and sweep them into your crease.
3. Line your upper lash line thickly with black eyeliner.
4. Line your upper water line with black eyeliner. This is to give the illusion of very full and thick lashes.
5. Line your lower lash line (thinly) with black eyeliner. This is to give the illusion that you have a thick lower lashes.
6. Line your lower water line with a nude/white eyeliner.
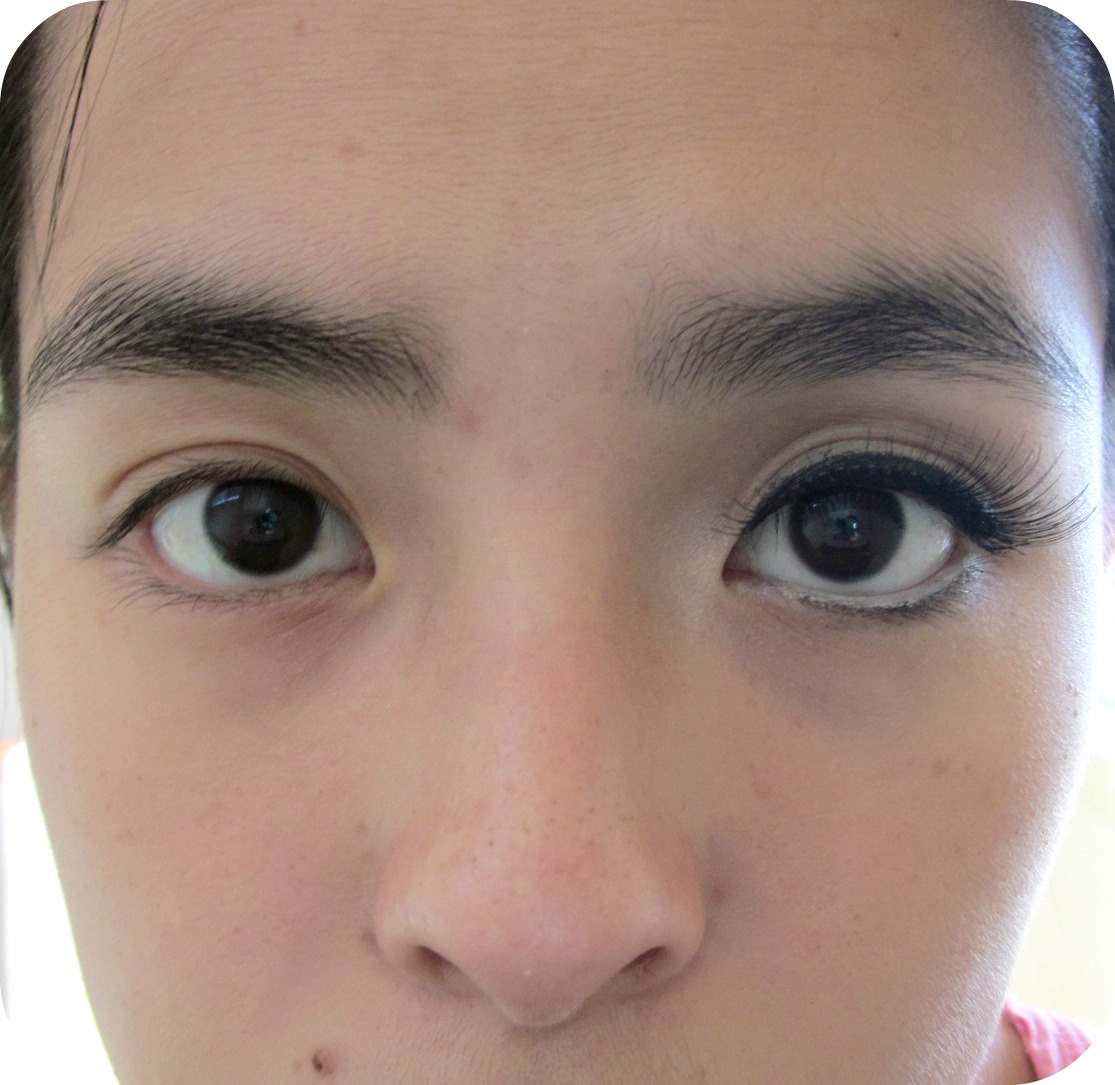
7. Apply false eyelashes if you wish. The one I used is from Eylure (pictured below).
Can you see a difference between the right and left eye?
So, ladies, what's the verdict. Should I stick with this style of tutorial or go back to ones like these?
Please note this is NOT a sponsored post; in case anyone got the wrong impression.
Raving about makeup, skincare, hair and other little obsessions... A Beauty Blog
Showing posts with label Naked Palette. Show all posts
Wednesday, December 5, 2012
Saturday, September 15, 2012
Triple S: Dramatic Navy Eye Makeup Tutorial
If you've read my post on Beauty on Pinterest, you'd remember how much I love this photo. So much so that it has inspired me to come up with a navy eye makeup look!
So here is the look I came up with! I would like to call this Pinspiration Look #1. (P.S. #2 is on its way.)
If you would like to see how I achieved it, just keep reading...
Step 1. Cut out a strip of magic tape and tape it onto the edge of your eyes at an angle (pointing towards the end of your eyebrows). This will give your eye makeup a nice clean edge. Proceed to filling in your brows if you need to. My brows are horrendously thick and natural-looking, so I didn't fill them in. If I did, it would look horrible.
Step 2. Colour in your lids with a navy eye pencil, stopping just beneath your crease. Make sure you go right up to the edge of the tape. Here I've used my Bobbi Brown's Long Wear Eye Pencil in Black Navy. It is perfect for this look because it's very pigmented and long wearing. It has a slightly creamy consistency so it goes on smoothly. It's a lot easier and faster than slowly packing on lots of powder eyeshadow.
Step 3. Pick up some Naked eyeshadow from the Naked Palette with a fluffy blending brush and blend this into your crease. This will also blend out the top edge of the navy eye pencil to soften up the look.
Step 4. Unfortunately, I forgot to take a photo for this step. What I did was remove the tape, and using my Bobbi Brown navy eye pencil again, I lined the outer half of my lower lash line with it. I also drew the colour up to join with the top.
Step 5. With a small flat brush, pat some glittery light sliver eyeshadow onto the centre of your lids. Don't bring it too far up; we don't want any on the crease. The silver glitter will help make the navy colour pop. I used Bobbi Brown's Rockstar Metallic Eyeshadow.
Step 6. Using a black pencil eyeliner, line your top lash line and your top and bottom waterline. It does not have to be perfect, you can just smudge it on with short strokes. Don't make the line on your top lash line too thick. We want the main feature to be the navy colour.
Step 7. Line the (remaining) inner half of your lower lash line with some dark glittery silver eyeshadow. I used Bobbi Brown's Gunmental Shimmer Wash Eyeshadow.
Step 8. Place some of the glittery light sliver eyeshadow onto the inner corners of your eyes to brighten the area. You can also use Virgin from the Naked Palette. I highlighted my brow arch with Virgin as well.
Step 9. Curl your eyelashes. I used my relatively new Shiseido eyelash curler.
Step 10. Load up your lashes with your favourite mascara. I used Rimmel's Scandaleyes mascara in Extreme Black.
Step 11. This step is optional. I put on a set of MAC #32 false eyelashes to make my lashes look as full as possible. They look wonky now because I did not know how to take care of them.
Step 12. Now for the face, put on your favourite foundation/tinted moisturiser. I used my Laura Mercier Tinted Moisturiser.
Step 13. Conceal any blemishes. As you can see, I have tons! My skin is not in its best shape at the moment.
Step 14. Powder your face, especially your T-zone which can get quite oily. I used my Smashbox Translucent Powder.
Step 15. Apply blush to your cheeks lightly. We do not want it to compete with the eye makeup. Choose a more natural browny pink colour. I used my Bobbi Brown Blush in Tawny. First I sculpted my cheeks with it, then I applied some to the apples of my cheeks.
Step 16. Line and fill in your lips with a nude lipliner. You may slick on a matching nude lipstick on top if you like.
Step 17. Apply some pink lipgloss to bring some colour back into your lips, to avoid looking like a corpse!
And there you have it! The completed look.
I also put my hair up into a top bun and wore some silver and navy earrings (to look more like the lady in the picture). I took a lot of photos for this look because I really loved it! It looks really nice in real life. Too bad I don't have a great camera to show its true beauty! But feel free to go through the photo gallery that I've compiled.
What do you think of this look? Love it or hate it?
![]() |
| Pinterest.com |
So here is the look I came up with! I would like to call this Pinspiration Look #1. (P.S. #2 is on its way.)
If you would like to see how I achieved it, just keep reading...
Step 1. Cut out a strip of magic tape and tape it onto the edge of your eyes at an angle (pointing towards the end of your eyebrows). This will give your eye makeup a nice clean edge. Proceed to filling in your brows if you need to. My brows are horrendously thick and natural-looking, so I didn't fill them in. If I did, it would look horrible.
Step 2. Colour in your lids with a navy eye pencil, stopping just beneath your crease. Make sure you go right up to the edge of the tape. Here I've used my Bobbi Brown's Long Wear Eye Pencil in Black Navy. It is perfect for this look because it's very pigmented and long wearing. It has a slightly creamy consistency so it goes on smoothly. It's a lot easier and faster than slowly packing on lots of powder eyeshadow.
Step 3. Pick up some Naked eyeshadow from the Naked Palette with a fluffy blending brush and blend this into your crease. This will also blend out the top edge of the navy eye pencil to soften up the look.
Step 4. Unfortunately, I forgot to take a photo for this step. What I did was remove the tape, and using my Bobbi Brown navy eye pencil again, I lined the outer half of my lower lash line with it. I also drew the colour up to join with the top.
Step 5. With a small flat brush, pat some glittery light sliver eyeshadow onto the centre of your lids. Don't bring it too far up; we don't want any on the crease. The silver glitter will help make the navy colour pop. I used Bobbi Brown's Rockstar Metallic Eyeshadow.
Step 6. Using a black pencil eyeliner, line your top lash line and your top and bottom waterline. It does not have to be perfect, you can just smudge it on with short strokes. Don't make the line on your top lash line too thick. We want the main feature to be the navy colour.
Step 7. Line the (remaining) inner half of your lower lash line with some dark glittery silver eyeshadow. I used Bobbi Brown's Gunmental Shimmer Wash Eyeshadow.
Step 8. Place some of the glittery light sliver eyeshadow onto the inner corners of your eyes to brighten the area. You can also use Virgin from the Naked Palette. I highlighted my brow arch with Virgin as well.
Step 9. Curl your eyelashes. I used my relatively new Shiseido eyelash curler.
Step 10. Load up your lashes with your favourite mascara. I used Rimmel's Scandaleyes mascara in Extreme Black.
Step 11. This step is optional. I put on a set of MAC #32 false eyelashes to make my lashes look as full as possible. They look wonky now because I did not know how to take care of them.
Step 12. Now for the face, put on your favourite foundation/tinted moisturiser. I used my Laura Mercier Tinted Moisturiser.
Step 13. Conceal any blemishes. As you can see, I have tons! My skin is not in its best shape at the moment.
Step 14. Powder your face, especially your T-zone which can get quite oily. I used my Smashbox Translucent Powder.
Step 15. Apply blush to your cheeks lightly. We do not want it to compete with the eye makeup. Choose a more natural browny pink colour. I used my Bobbi Brown Blush in Tawny. First I sculpted my cheeks with it, then I applied some to the apples of my cheeks.
Step 16. Line and fill in your lips with a nude lipliner. You may slick on a matching nude lipstick on top if you like.
Step 17. Apply some pink lipgloss to bring some colour back into your lips, to avoid looking like a corpse!
And there you have it! The completed look.
I also put my hair up into a top bun and wore some silver and navy earrings (to look more like the lady in the picture). I took a lot of photos for this look because I really loved it! It looks really nice in real life. Too bad I don't have a great camera to show its true beauty! But feel free to go through the photo gallery that I've compiled.
What do you think of this look? Love it or hate it?
Wednesday, August 22, 2012
Wicked Wednesday: Emily Blunt Inspired Makeup Tutorial
I wasn't aware of Emily Blunt (and her gorgeousness) until recently. I only noticed her after seeing the poster for the movie Five-Year Engagement. At first, I thought "Huh, interesting. Who is this actress?" I only started to get to know her (impersonally, of course) when I came across a small feature of her in an article written on Primped. A couple of weeks back, I was reading the June issue of madison (I take forever to read/finish a magazine) when I found an article on her in it.
The large photo of her (I believe, at the Tribeca Film Festival 2012) really caught my attention.The more I looked at the photo, the more I realise how amazing the makeup look she wore was! It's such a versatile look! It can go with practically any outfit, whether it's casual or formal.
Emily nailed her black eyeliner by having it nice and thick but not too flicked (or at least her makeup artist did). I also liked how the black eyeliner was balanced out with some gold shimmering eyeshadow under her eyes. I think that fuchsia is an all-rounder; you can wear it during both warmer and colder months. I'm currently obssessed with this lip colour so I'm giving Emily two thumbs-up for wearing it! Lastly, to avoid looking like a clown, Emily had her blush applied oh-so-subtly to her cheeks. Kudos to you and your makeup artist, Emily!
I love this look so much that I decided to recreate it. Besides that, I think that this look is universally flattering and I would like to show everyone that it can be easily achieved!
Step 1. I started off by covering my blemishes with concealer. You can put on foundation if you like, I just chose not to. Just remember to powder your face afterwards because for this look, Emily's skin was quite matte.
Step 2. For the eyeshadow, I used Urban Decay's Naked Palette in Half Baked. You don't have to use this particular eyeshadow. Any (lighter) gold shimmering eyeshadow will do.
Step 3. This step is optional. I applied the gold eyeshadow all over my lid and stopped before my crease.
Step 4. I lined my lower lash line with the same gold eyeshadow. Using a pencil brush would be best but since I have yet to own one, I just used the edge of my stiff eyeshadow brush (from Urban Decay).
The last picture is to show you what you'll end up with after you're done with these steps.
Step 5. Line your eyes with either black liquid or gel eyeliner. And do so thickly. Create a tiny flick at the end. Keep in mind that we are not aiming for cat eyes here. I used Bobbi Brown's matte black eyeshadow and a wet angled liner brush.
Step 6. Curl your lashes if necessary.
Step 7. Apply generous coats of mascara to your lashes. Don't forget to apply mascara to your bottom lashes as well. Emily's lashes looked very long but not particularly voluminous, you may want to choose a lengthening mascara if you want to stick as close to the original look as possible (but it really depends on your needs). I used Rimmel's Scandaleyes mascara, which is both lengthening and volumising on my lashes.
At the end of Step 7, my eyes looked like this. You may add false lashes if you wish (for more drama) but Emily kept her lashes looking quite natural.
Step 8. Moving on to the lips, I slicked on Revlon's Colorburst Lip Butter in Lollipop. This is my current favourite lipstick/balm and I will be posting up a review soon!
Step 9. I stopped at Step 8 but you may add a light blush if you wish. So ta-da! This is my finally look!
Do you like this look? What do you think of my tutorial? I'd love some feedback, thanks!
The large photo of her (I believe, at the Tribeca Film Festival 2012) really caught my attention.The more I looked at the photo, the more I realise how amazing the makeup look she wore was! It's such a versatile look! It can go with practically any outfit, whether it's casual or formal.
Emily nailed her black eyeliner by having it nice and thick but not too flicked (or at least her makeup artist did). I also liked how the black eyeliner was balanced out with some gold shimmering eyeshadow under her eyes. I think that fuchsia is an all-rounder; you can wear it during both warmer and colder months. I'm currently obssessed with this lip colour so I'm giving Emily two thumbs-up for wearing it! Lastly, to avoid looking like a clown, Emily had her blush applied oh-so-subtly to her cheeks. Kudos to you and your makeup artist, Emily!
I love this look so much that I decided to recreate it. Besides that, I think that this look is universally flattering and I would like to show everyone that it can be easily achieved!
Step 1. I started off by covering my blemishes with concealer. You can put on foundation if you like, I just chose not to. Just remember to powder your face afterwards because for this look, Emily's skin was quite matte.
Step 2. For the eyeshadow, I used Urban Decay's Naked Palette in Half Baked. You don't have to use this particular eyeshadow. Any (lighter) gold shimmering eyeshadow will do.
Step 3. This step is optional. I applied the gold eyeshadow all over my lid and stopped before my crease.
Step 4. I lined my lower lash line with the same gold eyeshadow. Using a pencil brush would be best but since I have yet to own one, I just used the edge of my stiff eyeshadow brush (from Urban Decay).
The last picture is to show you what you'll end up with after you're done with these steps.
Step 5. Line your eyes with either black liquid or gel eyeliner. And do so thickly. Create a tiny flick at the end. Keep in mind that we are not aiming for cat eyes here. I used Bobbi Brown's matte black eyeshadow and a wet angled liner brush.
Step 6. Curl your lashes if necessary.
Step 7. Apply generous coats of mascara to your lashes. Don't forget to apply mascara to your bottom lashes as well. Emily's lashes looked very long but not particularly voluminous, you may want to choose a lengthening mascara if you want to stick as close to the original look as possible (but it really depends on your needs). I used Rimmel's Scandaleyes mascara, which is both lengthening and volumising on my lashes.
At the end of Step 7, my eyes looked like this. You may add false lashes if you wish (for more drama) but Emily kept her lashes looking quite natural.
Step 8. Moving on to the lips, I slicked on Revlon's Colorburst Lip Butter in Lollipop. This is my current favourite lipstick/balm and I will be posting up a review soon!
Step 9. I stopped at Step 8 but you may add a light blush if you wish. So ta-da! This is my finally look!
| With more sunlight. |
| With less sunlight. |
| With effects. |
Do you like this look? What do you think of my tutorial? I'd love some feedback, thanks!
Saturday, August 4, 2012
Triple S: Photoshoot
I did this photoshoot at the start of the year to enter a photo competition. Just thought I'd share with you guys a couple of photos and the products I used to achieve the look.
For my face, I used:
- Bobbi Brown Natural Finish Foundation in Warm Beige
- Bobbi Brown Concealer in Warm Beige
- Bobbi Brown Sheer Finish Powder in Soft Sand
- Brown Brown Illuminating Bronzer in Aruba
- Bobbi Brown Blush in Nude Peach
Okay, so that soundsed like a lot of Bobbi Brown products. Allow me to rephrase: "For my face, the Bobbi Brown Makeup Artist used". Yes, so for my base, I did a 20 minute Secret To Perfect Skin lesson since that is the only way I could pull off a flawless face for the camera.
Moving on, for the eyes, I used:
- Urban Decay Naked Palette eyeshadows in Virgin, Sin and Toasted
- Bobbi Brown Eyeshadow in Matte Black as eyeliner
- Clinique High Impact Mascara
- MAC False Eyelashes in #33
Lastly, for my lips, I used Bobbi Brown Lip Gloss in Nougat (which went perfectly with the Nude Peach blush).
I would like to thank my wonderful photographer, RLD Photos.
For my face, I used:
- Bobbi Brown Natural Finish Foundation in Warm Beige
- Bobbi Brown Concealer in Warm Beige
- Bobbi Brown Sheer Finish Powder in Soft Sand
- Brown Brown Illuminating Bronzer in Aruba
- Bobbi Brown Blush in Nude Peach
Okay, so that soundsed like a lot of Bobbi Brown products. Allow me to rephrase: "For my face, the Bobbi Brown Makeup Artist used". Yes, so for my base, I did a 20 minute Secret To Perfect Skin lesson since that is the only way I could pull off a flawless face for the camera.
Moving on, for the eyes, I used:
- Urban Decay Naked Palette eyeshadows in Virgin, Sin and Toasted
- Bobbi Brown Eyeshadow in Matte Black as eyeliner
- Clinique High Impact Mascara
- MAC False Eyelashes in #33
Lastly, for my lips, I used Bobbi Brown Lip Gloss in Nougat (which went perfectly with the Nude Peach blush).
I would like to thank my wonderful photographer, RLD Photos.
Wednesday, May 16, 2012
Wicked Wednesday: Whoops! Too Much Liner?
I finally bought myself an angled eyeliner brush (ecoTools) and a lash/brow brush (manicare). I've only ever used a slightly rounded eyeliner brush by Bobbi Brown and I have to say that it's hard to do the cat eye with it. Don't get me wrong, it's a good quality brush and I love it. So I tested out ecoTools' angled eyeliner brush, by wearing a cat eye look to work.
My colleague said she liked what I did with my eye makeup but I'm not so sure about my customers. They were probably cringing inside at the sight of me. I think I over did it. It didn't help that I was wearing a strong eye colour: Smog from Urban Decay's Naked Palette.
It's uneven, I know. I still need more practice! But I did have fun trying to achieve this look. I probably should have saved it for a night out instead of wearing it for work! Oh well, I just hope that my good customer service made up for it.
I have to say that I'm quite impressed with ecoTools. Not only is the brush affordable, it's of good quality too. It's feels soft to the touch but it's stiff enough to create some nifty eyeliner looks. The manicare's lash brush is alright. It separates my "mascara-ed" lashes but not as much as I want it to. I guess I still haven't quite gotten the hang of it.
I hope you enjoyed this post! Do you wear the cat eye to work? Do you think it's appropriate for work? Comment below and share your thoughts!
My colleague said she liked what I did with my eye makeup but I'm not so sure about my customers. They were probably cringing inside at the sight of me. I think I over did it. It didn't help that I was wearing a strong eye colour: Smog from Urban Decay's Naked Palette.
It's uneven, I know. I still need more practice! But I did have fun trying to achieve this look. I probably should have saved it for a night out instead of wearing it for work! Oh well, I just hope that my good customer service made up for it.
I have to say that I'm quite impressed with ecoTools. Not only is the brush affordable, it's of good quality too. It's feels soft to the touch but it's stiff enough to create some nifty eyeliner looks. The manicare's lash brush is alright. It separates my "mascara-ed" lashes but not as much as I want it to. I guess I still haven't quite gotten the hang of it.
I hope you enjoyed this post! Do you wear the cat eye to work? Do you think it's appropriate for work? Comment below and share your thoughts!
Saturday, January 14, 2012
My Addiction to All Things Makeup
It feels wonderful to be truly back and participating in the blogging community. That's right. You guessed it! We finally have internet at home!! I'm beyond euphoric. It took us two months to get it because the stupid company kept stuffing up our order! Anyway, better move on before I sink into a bad mood about that matter...
I've been wanting to do "haul posts" for a while now but I haven't had the time and the access to internet to do it. So this is a "collective haul post" and I'm doing it in chronological order.
In October, I went on a mini shopping spree to reward myself for doing well in a few quizzes. I bought a MAC lipstick, Katy Perry's perfume Purr and a red lipliner from Natio.

Out of all the items, I think I was most excited about the MAC lipstick because it's my first one. Well, it's not my first lipstick per se. My first one is a Rimmel London lipstick in red. Anyway, this one is pink and it's called Plink!. Isn't that cute name? It's under the Lustre range and it's a pretty pink with shine and very minute bits of (what appears to be) glitter in it. When applied, it looks a bit sheer (like semi-matte) but it's obvious that you're wearing a pink lipstick! I love it so much that I wear it everytime I go to work.

I used to be a member on dropdeadgorgeousdaily.com and I earned a fair bit of DDGD$, which I could exchange for some "SWAG". I exchanged almost all of my points for a Natio set. It looked like such a good deal that I couldn't resist. After all, it was free! The set consists of a mascara, a liquid eyeliner and an eyeshadow palette. I haven't used any of the items yet. I initially wanted to do a giveaway on my blog with the eyeshadow palette but I somehow managed to make a big scratch on its plastic top that I see it not fit as a giveaway item.

The eyeshadow palette contains four colours. The shades are called Light, Gold, Bronze and Black. I must say that the "Bronze" looks more like a "Brown" and the "Black" looks more like a "Navy".

I've been wanting Urban Decay's Naked Palette for quite a few months now. I've read so many blog reviews and watched so many Youtube reviews and tutorials that I was convinced that my life would not be complete without it. So at the start of November, I ordered myself one from beautybay.com (I made sure there was a discount going on first!) and by the time it arrived, my end-of-semester exams were over. The timing was perfect.

In case you've never heard or seen the Naked Palette, this is what it looks like. It is the ultimate eyeshadow palette. All its colours are neutrals and so it is universally flattering. It comes with an eyeshadow brush and a small bottle of their famous Primer Potion (eye primer).

Here's a quick swatch that I did for each colour. I was a bit stingy so you may not be able to see the colours well on my skin. Do Google or Youtube it. It's AMAZING! Here's my favourite Naked Palette tutorial done by itsjudytime. My favourite colours are Virgin, Sin, Toasted and Hustle. So if you're a makeup-junkie-to-be, I suggest you get this palette. I can positively say that when it comes to eye makeup you can survive on this palette alone because you can come up with tons of looks with these 12 beautiful colours.

Then, came the dinner that I organised to celebrate mine and R's birthdays with some friends. That evening, I purchased a pair of MAC false lashes and wore it to the dinner. R was the one to pick them out and boy did he have a good eye! I'll upload a good photo of my makeup for the night once I get hold of them. It's on R's camera. I also bought a really gorgeous pair of Shu Uemura lashes a couple of weeks but I forgot to take a photo of it. I'll save that for my next beauty post. It costed me a lot of money but it's so beautiful that I reckon it's worth it.
But here's a photo of me wearing makeup for Christmas using the Naked Palette and my MAC lashes. And yup, that's my best friend Nop who was visiting me at the time.

Phew! We're finally at the end! You must be thinking. I actually wanted to put up more photos but I thought that it'd make this post way too long. So if you'd like to see more photos (up close shots) of the Naked Palette or my makeup for my birthday dinner and Christmas, just leave a comment below. If you'd like me to review any of the items that I've mentioned, please leave a comment as well. I hope you've enjoyed reading this post as much as I've enjoyed writing it!
I've been wanting to do "haul posts" for a while now but I haven't had the time and the access to internet to do it. So this is a "collective haul post" and I'm doing it in chronological order.
In October, I went on a mini shopping spree to reward myself for doing well in a few quizzes. I bought a MAC lipstick, Katy Perry's perfume Purr and a red lipliner from Natio.
Out of all the items, I think I was most excited about the MAC lipstick because it's my first one. Well, it's not my first lipstick per se. My first one is a Rimmel London lipstick in red. Anyway, this one is pink and it's called Plink!. Isn't that cute name? It's under the Lustre range and it's a pretty pink with shine and very minute bits of (what appears to be) glitter in it. When applied, it looks a bit sheer (like semi-matte) but it's obvious that you're wearing a pink lipstick! I love it so much that I wear it everytime I go to work.
I used to be a member on dropdeadgorgeousdaily.com and I earned a fair bit of DDGD$, which I could exchange for some "SWAG". I exchanged almost all of my points for a Natio set. It looked like such a good deal that I couldn't resist. After all, it was free! The set consists of a mascara, a liquid eyeliner and an eyeshadow palette. I haven't used any of the items yet. I initially wanted to do a giveaway on my blog with the eyeshadow palette but I somehow managed to make a big scratch on its plastic top that I see it not fit as a giveaway item.
The eyeshadow palette contains four colours. The shades are called Light, Gold, Bronze and Black. I must say that the "Bronze" looks more like a "Brown" and the "Black" looks more like a "Navy".
I've been wanting Urban Decay's Naked Palette for quite a few months now. I've read so many blog reviews and watched so many Youtube reviews and tutorials that I was convinced that my life would not be complete without it. So at the start of November, I ordered myself one from beautybay.com (I made sure there was a discount going on first!) and by the time it arrived, my end-of-semester exams were over. The timing was perfect.
In case you've never heard or seen the Naked Palette, this is what it looks like. It is the ultimate eyeshadow palette. All its colours are neutrals and so it is universally flattering. It comes with an eyeshadow brush and a small bottle of their famous Primer Potion (eye primer).
Here's a quick swatch that I did for each colour. I was a bit stingy so you may not be able to see the colours well on my skin. Do Google or Youtube it. It's AMAZING! Here's my favourite Naked Palette tutorial done by itsjudytime. My favourite colours are Virgin, Sin, Toasted and Hustle. So if you're a makeup-junkie-to-be, I suggest you get this palette. I can positively say that when it comes to eye makeup you can survive on this palette alone because you can come up with tons of looks with these 12 beautiful colours.
Then, came the dinner that I organised to celebrate mine and R's birthdays with some friends. That evening, I purchased a pair of MAC false lashes and wore it to the dinner. R was the one to pick them out and boy did he have a good eye! I'll upload a good photo of my makeup for the night once I get hold of them. It's on R's camera. I also bought a really gorgeous pair of Shu Uemura lashes a couple of weeks but I forgot to take a photo of it. I'll save that for my next beauty post. It costed me a lot of money but it's so beautiful that I reckon it's worth it.
Phew! We're finally at the end! You must be thinking. I actually wanted to put up more photos but I thought that it'd make this post way too long. So if you'd like to see more photos (up close shots) of the Naked Palette or my makeup for my birthday dinner and Christmas, just leave a comment below. If you'd like me to review any of the items that I've mentioned, please leave a comment as well. I hope you've enjoyed reading this post as much as I've enjoyed writing it!
3 comments:
Tags:
False lashes,
Katy Perry,
Lipstick,
MAC,
makeup,
Naked Palette,
Natio,
Urban Decay
Subscribe to:
Posts (Atom)


