Raving about makeup, skincare, hair and other little obsessions... A Beauty Blog

Saturday, January 28, 2012

Gurls with (Fake) Curls!

Image source: becomegorgeous.com

My hair is naturally straight. Just like many of you who defy the laws of nature, straightening your curly hair, I permed my straight hair. In my last post, I talked about curly hair updos. I thought of those who have straight hair. I mean, what about you ladies who don't want to fork out a lot to get curly hair that lasts only a few months? What if you like to have curly hair sometimes and straight hair other times? Well, you're in luck because there are diverse ways of getting those locks of yours curly!

Got a curling iron? Try:
Krista's Romantic Curls
Jessica Harlow's Hair Curling Tutorial

Got a hair straightener? Try:
Jessica Harlow's How to Curl Hair with a Flat Iron
maikmoua's How to Curl Hair with a Straightener

Want to do it the "natural way"? Try:
Krista's Heatless Curls
Evenlinicutza's Heatless Curls/DIY Hair Rollers

Take your pick. All of the tutorials listed in here are my favourites. I hope you like them as much as I do!

I would also like to give a special mention to Evenlinicutza. I think that this beauty trick is very clever and I want to share it with everyone! This is really great if you can't afford false eyelashes but want to achieve a similar effect.

Enjoy!

Song for the post.

Curly Hair Updos

So I ran dry on inspiration recently. That's why I haven't posted in a few days. Plus, I've been busy helping mum prepare food for a big lunch that we hosted. Anyway, I was meant to be studying when I suddenly felt like playing with my hair for a bit. I wanted to try out a couple of updos for curly hair. Yes, I permed my hair again recently. Here's a photo of what my hair looked like on the day of the perm. I apologise for the quality of the photo because it was taken from my phone.


It's been a couple of weeks since the perm and my hair looks different again. I will take another photo with my camera once the giant pimple on my chin is gone. The following are links to tutorials of three favourite updos of mine. They are the type that don't ruin permed hair. Or at least I think so.

Remember Rihanna's 80s Curly Updo? Well you can achieve this hairstyle by watching this tutorial.

Image source: beautyriot.com

Going for a romantic dinner with your significant other this Valentines Day? Why not try LuxyHair's gorgeous side updo for size?

If you have shorter but curly hair and want to style it up for an occasion or just a day out with your girlfriends, try TBD's Short Hair Chignon.

Enjoy!

Song for the post.
Sunday, January 22, 2012

Pretty Pout

Source: lifestylelebanon.com

So if you read my recent haul post, you would know by now that I bought a MAC lipstick and I love it to bits. There's only a tiny problem in our lipstick-owner relationship. My lipstick doesn't love me back as much. My lips shrivel up within minutes of application. I don't know if its the ingredients/formula for Plink! in particular or if all MAC lipsticks will have the same effect on me. As much as I love the colour, it's causing me a lot of grief. There is no way I'm going to throw it out (it costed me a lot of money).

As I desperately tried to get my full pout back, I slicked on my Bobbi Brown Lip Balm religiously, day and night. It helped my lower lip but it couldn't save my upper lip. For a while, I thought I was doomed to have a shrivelled upper lip forever. I've done some reading and I learnt that there's a difference between lip balms and lip moisturisers. Some lip balms help keep moisture in but does not actually hydrate our lips. So if your lips don't have much moisture to begin with, those lip balms aren't going to do you much good.

I recalled reading a post on TBD some time back. It was on a DIY lip scrub. I even read on a number of websites (one of which was beautyheaven.com) that lip scrubs exfoliate your lips, removing all those dry and dead skin cells, and make your lips softer and smoother. I decided that I have nothing to lose, so I gave it a try. I followed the instructions on TBD's post (well, more or less). Here's what I did differently:

- Instead of a teaspoon, I used a tiny teaspoon (yes, there's such thing) for the raw sugar and honey.
- I did not leave the lip scrub on for a few minutes. Once I slicked some on, I started to scrub my lips gently in circular motions.
- Afterwards, I remove the lip scrub with water and pat my lips dry with a towel.
- I then apply a layer of Lucas' Papaw Ointment, if not olive oil.
- I stored it in a small container. The recipe is for multiple uses. It doesn't go bad because honey itself is already "too sweet" for bacteria to survive on.

The results are astonishing. I did this on alternate days and after a couple of times, my lips were no longer shrivelled. They're now smooth and soft, almost completely back to its former glory! Unfortunately, I did not take a before and after photo. You will just have to take my word for it.

There are some variations for homemade lip scrubs. The most basic one is the one I tried. If you are up for something more complex and even more beneficial here are a couple of good ones:
Deliciously Organized's Lip Scrub
Pink Pistachio's Lip Scrub

Want kissable lips? Michelle Phan shows us how to achieve it.

Enjoy!

Song for the post.
Saturday, January 21, 2012

Missoni Nail Art


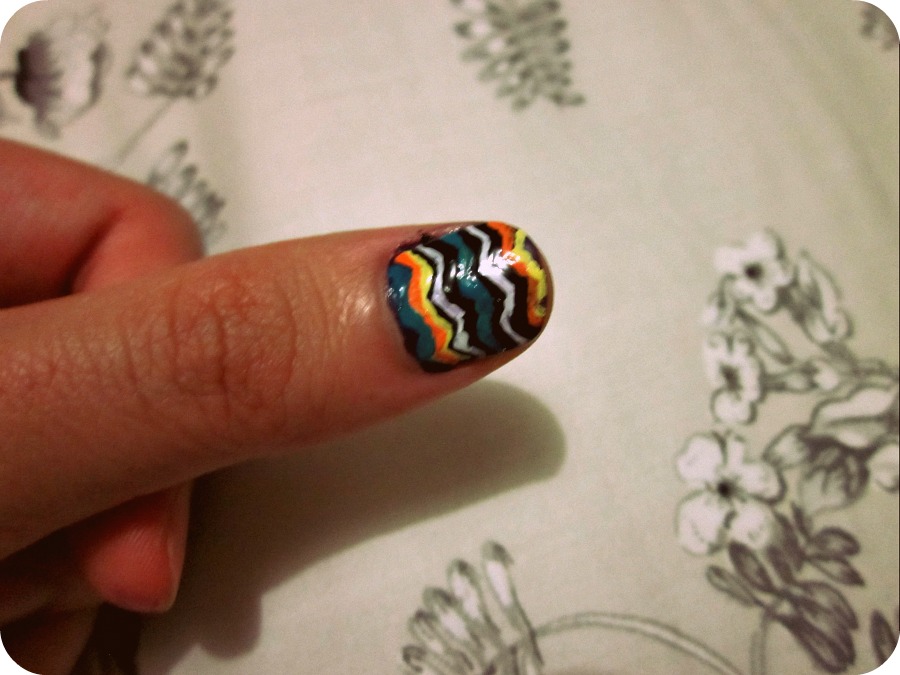
I was inspired by TBD's post on missoni nail art that I tried it out myself. I only did it on my thumb because I wasn't even sure I could pull it off. Plus, it's time consuming if you are meticulous, can't stand crooked lines and want to get it absolutely perfect.


Mine doesn't look all too good up close. But if I hold my thumb away far enough, it looks pretty cool. The fun thing about this is that the colours don't have to go in any specific order. You can change the colour order for different fingers. It's up to you which colours are to be repeated and which aren't. If your nail polish doesn't come with a fine tip brush, you'll need a small and thin paint brush.

Colours I used:
Dark purple (as the base)
Black (one with fine tip for nail art)
White
Bright orange
Bright yellow
Turquoise

Get creative! You don't have to stick with the colours I used. Google "Missoni" for some ideas. After having done it on my thumb, I feel like doing it to all my nails now. I should really be studying though! Enjoy.

P.S. If you have any questions, feel free to drop a comment and I'd be happy to answer it for you.

Songs for the post.
Wednesday, January 18, 2012

Style Files

If I were to skim through Lookbook.nu or the Fashion category of Pinterest.com, which outfits do I like and would wear? I'll give you a few ideas. Note, this is just for fun and I'm not saying that these outfits would suit me or be flattering on me.

I found this on Pinterest and the original source is Tumblr. Ever since I saw this photo, I've been searching for a similar-looking blazer. I wanted the same colour as well. So far, no luck. I reckon this would be a good day out look.


I saw this next one on DDGD, the original source is Lookbook.nu. This looks lovely for a night out during summer. I absolutely love how the photo was taken as well. I'd love to pull off a dress like that but unfortunately, I am not tall enough.


I really like the look of those button-up skirts. They can be made from men's work shirts. This outfit is so wearable. I can imagine myself donning it to uni during winter. Source: Lookbook.nu


I really like how she matched her lipstick to her scarf. Or it could have been the other way round. I think it is a really cute look. A pop of colour amidst all the white snow! Source: Lookbook.nu


That's all I have for now. Till next time!

Song for the post.