Raving about makeup, skincare, hair and other little obsessions... A Beauty Blog

Showing posts with label Hair. Show all posts
Saturday, March 1, 2014

Chopping My Hair Off for a Cause


If you've heard of The World's Greatest Shave, then you'd know that it's a mighty thing to do, especially a girl. One of my friends will be shaving this month and I thought it was very brave of her. I wanted to contribute as well. So I decided to donate my hair to Pantene Beautiful Lengths.


This is how long my hair was prior to the chop.


Ann-Marie helped me make the chop, literally. I handed her scissors and asked if she could help me cut my hair off. This is how short my hair was afterwards.

The next morning, I went to the hairdressers and got my hair styled and tidied up.


I got it done at Oscar Oscar by a Japanese lady. I loved the results. I don't regret chopping my hair off at all. The donated hair will be made into a wig for a cancer patient who has lost his/her hair during treatment. It's all for a good cause.


What do you think of my new hair? Do you like it? Will you ever donate your hair?
Saturday, December 7, 2013

Lee Stafford Hair Growth Treatment Review


Lee Stafford Hair Growth Treatment 
Claims: "Fertilises your follicles whilst going deep down into the cortex to condition and strengthen from within. Reduces irritation and moisturises the scalp."
RRP: AUD16.99
Packaging: 5 out of 5
Review: I don't generally write negative reviews but this product, unfortunately, warrants one. I bought this because Sharon Farrell on Youtube recommended. She loves this product and says that it has helped her grow her hair longer. Upon further research, I found more positive reviews than negative ones. With my fingers crossed, I went out and bought this product.


This product has a very strong floral scent. The first few times I smelled it, I thought it was nice. After that, it started irritating my nose. That's the first strike. The first couple of times I used this treatment, my hair felt nice and soft afterwards. With subsequent uses, I felt like my hair was not benefiting from the use of this product. I did not see an increase in length of my hair. What's worse? Every time I used it, a pimple would pop up on my scalp a couple of hours later. And that was the last straw for me.

I've stopped using this treatment but have yet to get around to throwing it out. Just as well I bought it at 40% off. Otherwise, it would have been an even bigger waste of my money! I am not trying to say that this is an absolutely horrible and disgusting product. All I'm trying to do is warn you. This product could potentially cause scalp acne if it's not suitable for you. If this product has worked wonders for you, then that's good for you and I envy you!

Have you ever experienced any negative effects from using a hair treatment product?
Saturday, November 9, 2013

Rusk MiraCurl Review and Demo


Rusk MiraCurl
Claims: "Effortlessly creates perfect curls everytime... Has a ceramic curl chamber which eliminates frizz while leaving hair full of body, volume and luster."
RRP: AUD199
Packaging/Design: 4.5 out of 5
Review: This curler is very quick and easy to use. It takes me only 15 minutes to curl all my hair (I usually take half an hour with a regular curling iron). It's also very easy to learn how to use it and get the hang of it. The only reason I gave it a 4.5 out of 5 for package/design is because it's a bit heavy. Otherwise, it's an excellent hair styling tool. I give a more in-depth review and demo of the product in the video below. Note: I believe this product is called Curl Freak in the USA.


What do you guys think? Game to try this method of curling your hair?
Saturday, October 26, 2013

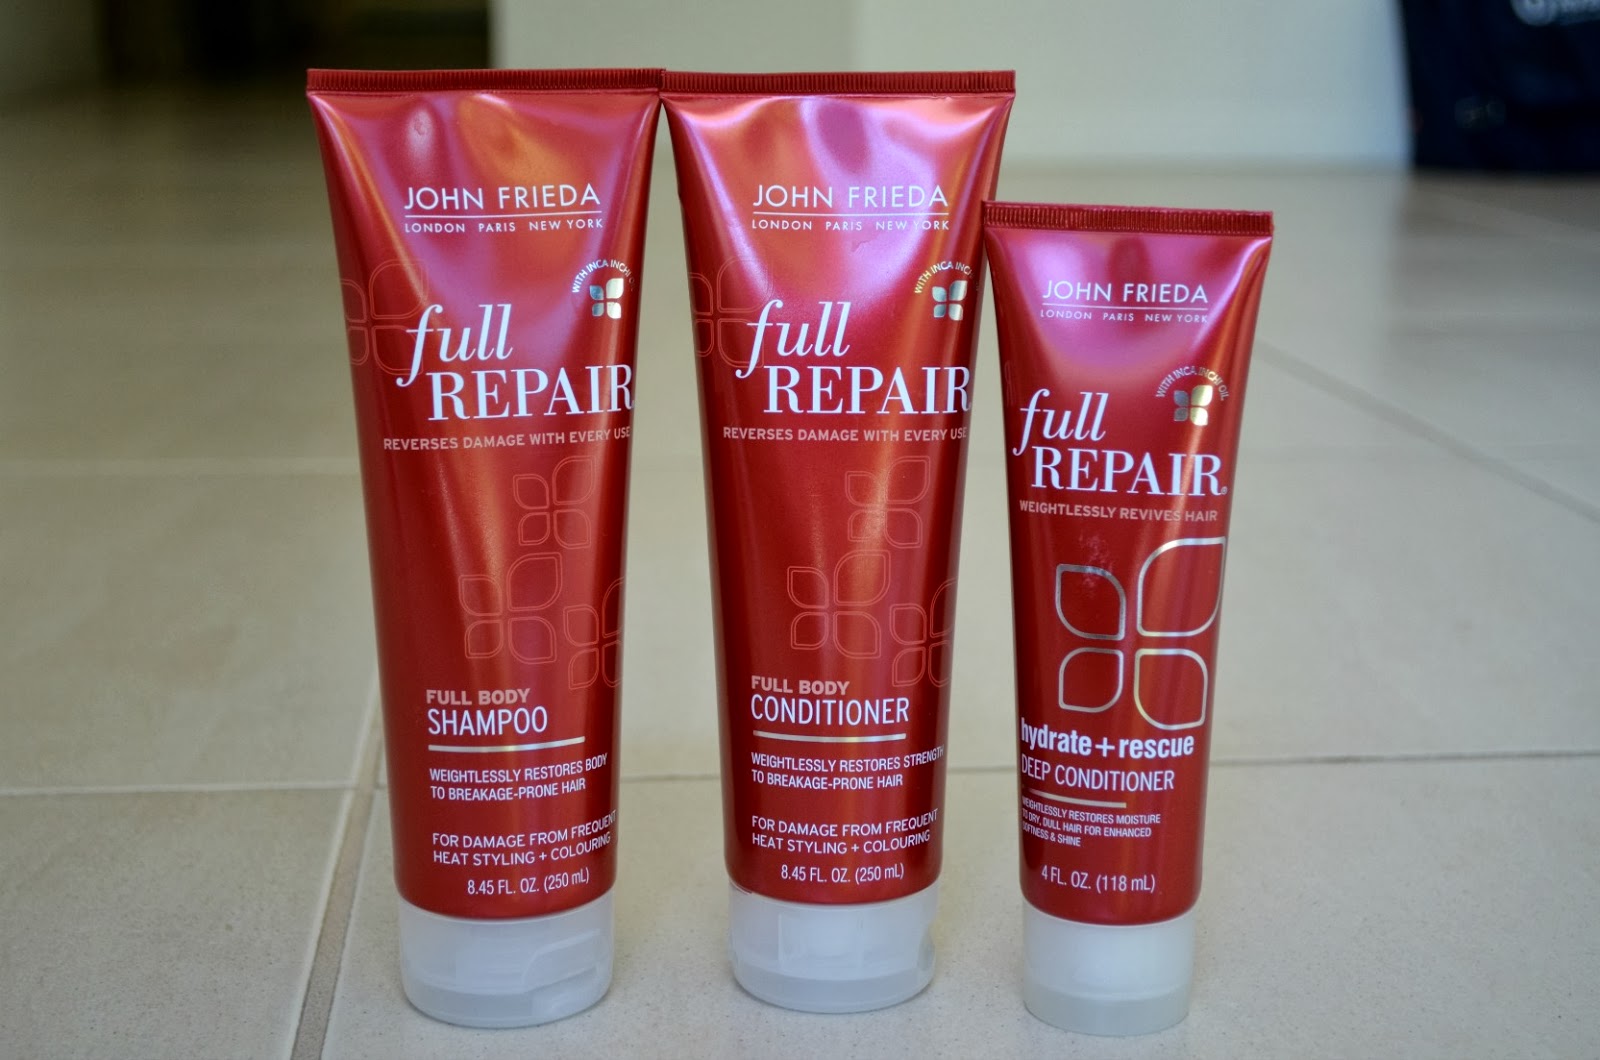
John Frieda Full Repair Shampoo, Conditioner and Deep Conditioner Review

It's been a really busy week and I'm really sorry I hadn't been able to write a post for Wednesday like I normally do. I'm afraid this is going to be the case for the next month or so. I have exams coming up and after that I'll be going overseas (on holiday). So please bear with me! I promise I do have some awesome tutorials planned, they just require a lot of time to make so they won't be up on this blog anytime soon. And yes, this also means that majority of my posts for the next month will be mainly reviews.

So, until I return from my trip around mid December, I'll only schedule posts for once a week. But after that, it'll be back to the normal schedule of twice a week (Wed and Sat). I also promise I will make it up to you guys. *hint hint* Giveaway to come! 

Anyway, let's dive into this review!


John Frieda Full Repair Full Body Shampoo
Claims: "Targets short, broken hairs, flyaways, and damaged ends. The shampoo is formulated with inca inchi oil, a micro-oil rich in Omega-3, which penetrates dry, damaged hair and repairs the look and feel of overworked hair."
RRP: AUD15.99
Packaging: 5 out of 5

John Frieda Full Repair Full Body Conditioner
Claims: "Penetrates dry, damaged hair and smoothes and detangles hair, reducing the risk of breakage."
RRP: AUD15.99
Packaging: 5 out of 5

John Frieda Full Repair Hydrate + Rescue Deep Conditioner 
Claims:  "Infuses the hair with moisture to improve the look and feel of damaged hair.The conditioner deeply replenishes and restores softness and shine, targeting hair in its most damaged areas."
RRP: AUD16.99
Packaging: 5 out of 5

Review: My hair has been feeling a bit dry lately. Perhaps it's due to the change in weather but it's really unhappy. I rarely get breakage and split-ends up they've suddenly popped up. I keep trimming them off for "damage control" but I know that I'd need a more long-term solution. Introducing...! Nah, I better stop sounding like an advert. So, I was sent the Full Repair range to try out. Although I have yet to see a reduction in breakage and split-ends, I do have positive findings to report.

Most hydration/repair type of hair care products weigh the hair down so we tend to lose body and volume as a compromise for soft silky strands. With this trio, I noticed that volume is retained and it adds moisture back into my hair. This is particularly true with the Deep Conditioner. I love how soft my hair feels after using it. All three products have similar scents. I'm happy to announce that it's pleasant and non-irritating to my sensitive nose. The formula is slightly "gel-like" and the shampoo lathers up relatively easily.

Word of warning, once you've used the Deep Conditioner, you'll find that the Conditioner is not as "powerful" in comparison and will be tempted to just stick to the Deep Conditioner. Too much of a good thing is never good, you should use it in moderation. Plus it'll be quite costly to use it as your everyday conditioner. Just make sure you cover all of your hair with Shampoo, not just your scalp. Rinse off. Apply Conditioner. WAIT for a minute. Rinse off. If you're in a hurry to wash the conditioner off, it will not get the chance to work its magic. I've been guilty of this crime before.

I hope that with continued use, the next time I post an updated review, my hair will be damage-free!

Do you suffer from split-ends and breakage like I do? Do share your hair woes! 
Saturday, June 22, 2013

A Night with GHD + Oscar Oscar

Source: ghd.com
I attended one of Oscar Oscar Salon's GHD VIP Nights a few weeks back. I've been wanting to go since last year and finally got the means to attend this year. I was hoping they'd still do the "trade in your old straightener for a new GHD styler" deal again but unfortunately they didn't.

The event kicked off with a demonstration of how to create the runway hair looks from Sydney Fashion Week 2013 (If memory serves me right!). I managed to take a lot of photos on the night. Hope you like them! 


Demonstrating the new GHD Eclipse Styler


Styling a romantic ponytail


End result


The "blow dried curls" look is coming together


I would like to thank my housemates Ann-Marie and Mengying for coming along with me! Unfortunately, Mengying didn't join us for a photo. After the demonstration, we were given the chance to be styled by the Oscar Oscar hairdressers.


My hair was styled by a GHD Gold Styler
I picked up a couple of tips on the night and would like to share them with you. 

Tip #1: To achieve volume when curling with a straightener, make sure you hold your lock of hair up vertically and clamp your straightener/styler as close to the roots as you can and start from there. It will give your hair near the roots a lift. 

Tip #2: To set you curls and make them last, clip them up (with either alligator or pin curl clips) immediately and let them cool. If you are in a hurry, blast them with your hairdryer on COOL setting.

Goodie bag!


We were sent home with a goodie bag each. Inside were samples of Kerastase products, a GHD Tail Comb, a $20 Gift Voucher, a discount code for Talulah, a cookie and a couple of Kerastase pamphlets. 

Overall, I think it was an interesting and eye-opening event. Will I be going back next year? Probably not. I do not mean any offense to GHD or Oscar Oscar. I just think that going once is enough. I will not be gaining anything more out of it by going year after year. It'd be a waste of my time, energy and money. Having said that, I think a lot of the attendees thoroughly enjoyed the event and I think that it is definitely worth going once to experience it. Sorry GHD, I am not a convert as of yet.
Monday, March 4, 2013

How I Made My (Asian) Hair Softer and Shinier

As hard as it is to believe, I've finally reached a beauty goal of mine! I've finally achieved softer and shinier hair despite my genetics dictating that I should have coarse, straight-like-sticks, Asian hair. This post isn't a tutorial because I don't have the universal answer for soft and shiny hair. I only know what works for me now. It may or may not work for you (because your hair and mine are not the same). Please take what I say as tips and hopefully they are helpful!


I've experimented with different shampoos over the past two years. Along with fighting back dandruff and poor attempts at preventing hair fall, I was also aiming for softer and smoother hair. I've always envied all the Caucasian women with their soft silky hair (particularly the blondes). My target was reached when I started using Clear Scalp & Hair Beauty Therapy Total Nourishing Care Shampoo and Conditioner consistently. Boy, that was a mouthful! I noticed my hair became a lot softer. Not as soft as those blonde ladies, of course. Genetics still holds me back. Nevertheless I was pleasantly surprised.

I've always made hair oil a part of my routine now. Currently, I'm using Dove Nutritive Therapy Nourishing Oil Care Nutri-oil Serum. What's with hair products and long names? I apply it once a day. I usually use it after I've washed and blow-dried my hair. It helps my hair stay soft and gives my strands a really nice shine without looking greasey/oily.


My tips
  • Keep trying different shampoos and conditioners if you can. I think the trick is to find the right one that works for your hair. Herbal Essences works for a good friend of mine and she has Asian hair too! 
  • I think hair oils/serums are important. You can't have soft and shinier hair with dry and malnourished locks! 
  • I only wash my hair twice a week, thrice at most. I think it's important to not over-wash. It allows your own natural scalp oils to nourish your hair (at the roots particularly).
  • I try to rinse my hair with cold water (or as cold as my body can stand it). I've read articles explaining that it closes the cuticles, making the hair shinier. 
I hope this post helps you in achieving your dream hair. Good luck! 

Do you have any hair softening or shining tips? Please do share!
Saturday, December 22, 2012

So Obessessed!

I've been obssessed with balayages for a very long time now. Yes, I know. The trend is kinda old but apparently it is still chic to have one. Why didn't I just go and get it done? Well, I'm just afraid it will look terrible on me, especially because I'm Asian. Here are photos of some that I like.


pinterest.com

pinterest.com

pinterest.com

What do you guys think? Should I get it done? Or is this hairstyle over rated?

P.S. Sorry this is a really short post. I have been really busy at work 'cause we're short-staffed at the moment. I promise that the next post will be a good one!

P.P.S. Have a Merry Christmas!!

Sunday, August 26, 2012

Lauren Conrad Style Top Bun with a Hair Donut (Tutorial & Mini Review)

Please allow me to introduce to you my awesome friend, Marj. She is a fun-loving, free-spirited and cheerful girl who has kindly agreed to be my model for this hair tutorial.


Remember the post that I made some time back about buying a hair donut? Well today, I will show you how to use it (hopefully) to do a Lauren Conrad Style Top Bun!

Stylebistro.com

I will also do a quick review on the hair donut at the end of this post. So let's begin!


Marj has very long hair. The photo above is to give you an idea how long it is. She would need a hair donut that is at least medium-sized or larger to "fit all of her hair in". Before we started, I brushed her hair and prepped it with Aveda's Light Elemenets Smoothing Fluid to make her locks smooth, soft and shiny.


Step 1. Tilt your head forward and gather all of your hair into one big bunch. If you have a fringe, you can leave them out.


Step 2. Lift your head back up and tie the bunch of hair into a high pony tail. The position of your ponytail depends on where you want your bun to sit. For example, If you want your bun to sit directly on top of your head, then your ponytail should be on top of your head. In Marj's case, she did it a little towards the back of her head.


Step 3. Now, grab your hair donut and put all five of your finger through the centre of the donut. Start pulling your hair/ponytail through the centre. It's similar to how you put on a scrunchie (except you don't twist the donut and loop it around).


Step 4. Pull all of your hair/ponytail all the way through and make sure that the donut is sitting against your head.


Step 5. Next, tilt your head slightly forward and spread your hair over the donut and smooth them down as evenly as you can.


Step 6. Start by taking a lock of hair and pull it diagonally across and backwards (making sure that the donut is covered by the hair). In the process, start tucking the hair under the donut. Keep one hair on top of the bun to have better control and to make sure the bun will turn out smooth.


The photo above is a side shot of the previous photo.


Step 7. Pin that lock of hair down with a bobby pin. Make sure you direct your pin towards the centre of the bun and make sure pin will end up hiding underneath the donut.


Step 8. Continue with the same process (Step 6 & 7) around your head/donut. Make sure you stick with the same direction. Don't worry if there is "leftover" hair (the remaining length of your hair). Just gather it and combine it with the next lock and it will eventually get tucked in under the donut/bun. If you've already covered the whole donut with hair and you still have some lengths of hair left out, just twist it a little and tuck it around and under your bun. Pin it in place to avoid your bun coming undone.


Step 9. Pin up any loose/stray hair (that are too short ot be included in the bun).


And there you have it! A Lauren Conrad-esque top bun!


It's okay if the do looks a bit messy. It just makes it look effortless. Doesn't Marj look pretty? I think so too!

Review: Overall, this is a good little hair accessory to have but it is expensive at AUD10. You can make a sock bun, which would be cheaper, but the size won't be as big and the shape won't be as smooth. Not that it really matters. The quality is decent and I think it will last me a very long time (fingers crossed). My sock buns are fraying where I had cut off the toe area.

I would like to thank Marj for letting me play with her hair.  I would also like to thank RLD photos for taking and editing the photos. If you liked the photos in this post, please feel free to like his Facebook page! He will be uploading extra photos in the near future.

What do you think of this hair tutorial? Was it helpful? Would you like a sock bun version of this tutorial? Please leave a comment below! Thank you!
Saturday, August 4, 2012

Winner of Wave Envy Giveaway

I don't normally put up two posts in one day but I was so excited that I couldn't wait till Wednesday (or tomorrow even) to announce the winner for my Wave Envy Giveaway.


To make things fair for all the entrants, I've decided to randomise everyone's entries (something that I wish I did for my earlier giveaways). So I put everyone's name into the List Randomizer on random.org.


As you can see there were a total of 17 entries and all of the names have been rearranged. This is so that it doesn't matter when you entered this giveaway.


Then, I generated a number randomly to come up with the winner!


Congratulations to Sarah! You're the winner of my Wave Envy Giveaway!


If Sarah does not reply my email within one week, I will redraw and announce a new winner. If you did not win this giveaway, don't fret my pets, I have another one running at the moment and it's even bigger than this one!!