Raving about makeup, skincare, hair and other little obsessions... A Beauty Blog

Saturday, November 30, 2013

Purple and Gold Party Eye Makeup Tutorial


Party season is here! It's time to bring out your stash of amazing false eyelashes and glitter pigment. Today, I'm going to show you how to do a simple yet stunning purple and gold eye makeup. The star product of this tutorial is the Rimmel London Scandaleyes Eye Shadow Sticks in Paranoid Purple. 

Here are the steps: 


1. Prep your eyes with primer. Here I'm using Benefit's Stay Don't Stray Primer. I simple dot some product all over my eyelids and then blend it out when my ring finger. 


2. Apply Paranoid Purple all over your eye lid, staying below the crease and steering clear of the inner corners of your eyes. Blend it out a little with your ring finger. 


3. With an eye shadow brush, apply a deeper purple or brownish purple colour to the outer corners of your eyelids. I used Hustle from the Urban Decay Naked Palette.


4.  With a blending brush, work a neutral light brown colour into your crease. I used Naked from the Urban Decay Naked Palette. 


5. Swipe some Paranoid Purple onto your pencil brush and run the colour under your lower lash line. 


6. With an eyeshadow brush, pat some gold eyeshadow or pigment onto the inner corners of your eyes. I used Half Baked from the Urban Decay Naked Palette. 


7. Lastly, line your top lash line with long lasting black gel/liquid liner. Curl your lashes and apply lots of mascara 

8. This is optional. You can draw black liner on your top waterline and apply false eyelashes for an even more dramatic eye makeup look. 


I love purple and gold together. It's my favourite combination! 


I was partly inspired by the purple and gold top and necklace that I was wearing at the time. 


Please excuse the unruly brows!


Hope you found this helpful and enjoyed reading this post. I will be posting more tutorials using the Rimmel Scandaleyes Shadow Sticks soon. Keep an eye out! 


What's your go-to party eye makeup look?
Saturday, November 16, 2013

HG Search: Moisturiser - Kiehl's Ultra Facial Cream Review


Kiehl's Ulta Facial Cream 
Claims: "24 hour, light-textured hydrator. Reduces moisture loss. Continuous water replenishment throughout the day."
RRP: AUD34/AUD64 for 50mL/125mL
Packaging: 5 out of 5
Review: The first time I tried this product when was my mother bought a jar home and told me to try it. After cleansing and toning my face, I applied some all over my face and went to bed. The next morning, my skin still felt soft and smooth. It wasn't long before I went and got myself a 50mL jar too (R kindly paid for it). I've been using it for more than two months now and have hit the base of the jar. My mother has hit base too. And guess what? We went out and bought a 125mL jar each!


So by now, you'd know where this review is heading. Yes, this story has a "happy ending". You can stop reading now and go buy yourself one to try... Oh! You wanna know more? Okay then. This moisturising cream is very lightweight with a gel-like consistency. Kinda similar to the consistency of Bobbi Brown's Hydrating Gel Cream. It goes on smoothly and absorbs quickly so there's no sticky feeling. If you apply makeup soon after, it is tacky enough to work as a primer.

I love that this product keeps my face hydrated all day and night, regardless of whether the weather is wet/dry/warm/cold. It feels like I'm giving my skin water to drink. A word of warning though, if you have extremely dry skin, whereby it's peeling and patchy, this may not be powerful enough of a moisturiser for you; something like Creme de La Mer might be better for you. Otherwise, I am very happy with this product and it's currently my Holy Grail moisturiser. I know what you're gonna say. But it came in a jar! That's unsanitary! Well, as long as you wash your hands well with soap and dry them properly before dipping your fingers into the product, I don't see any problems with it, especially if it's solely for your own use. Hence, I have not deducted any points from packaging.


What's your Holy Grail moisturiser (if you have one)? 
Saturday, November 9, 2013

Rusk MiraCurl Review and Demo


Rusk MiraCurl
Claims: "Effortlessly creates perfect curls everytime... Has a ceramic curl chamber which eliminates frizz while leaving hair full of body, volume and luster."
RRP: AUD199
Packaging/Design: 4.5 out of 5
Review: This curler is very quick and easy to use. It takes me only 15 minutes to curl all my hair (I usually take half an hour with a regular curling iron). It's also very easy to learn how to use it and get the hang of it. The only reason I gave it a 4.5 out of 5 for package/design is because it's a bit heavy. Otherwise, it's an excellent hair styling tool. I give a more in-depth review and demo of the product in the video below. Note: I believe this product is called Curl Freak in the USA.


What do you guys think? Game to try this method of curling your hair?
Saturday, November 2, 2013

Nail Colours for Summer

Hey ladies, just thought I'd do a quick post on what colours I've been wearing on my nails lately.


For my fingers, I've been using OPI's Alpine Snow. I noticed that white is in trend right now, especially now that our weather Down Under is warming up. I really like it because it makes your digits look clean and sophisticated.


For my toes, I've been wearing OPI's Do You Lilac It? Seriously. Do you? I know I do! Purple is my favourite colour and the best way to keep it on my digits is to go for lighter shades during the warmer seasons. Please excuse my ugly blister patches...


Lastly, I just want to make a quick mention of another two hero nail products. The base coat and top coat. Both by OPI (of course!). The base coat keeps my nails from being stained and protects my nails from being stripped and peeled. I notice this whenever I remove my nail polish and my nails seem to take forever to recover. Now, it's no longer a problem. The top coat keeps my nail polish on for longer and gives it a beautiful shine. It also does not cause streaking like my previous Cutex base + top coat. Tip: avoid buying those two-in-ones. Generaly rule of thumb is that base and top coats do two different things and so should be two different formulas.


What's your favourite nail polish colours for this Summer?
Saturday, October 26, 2013

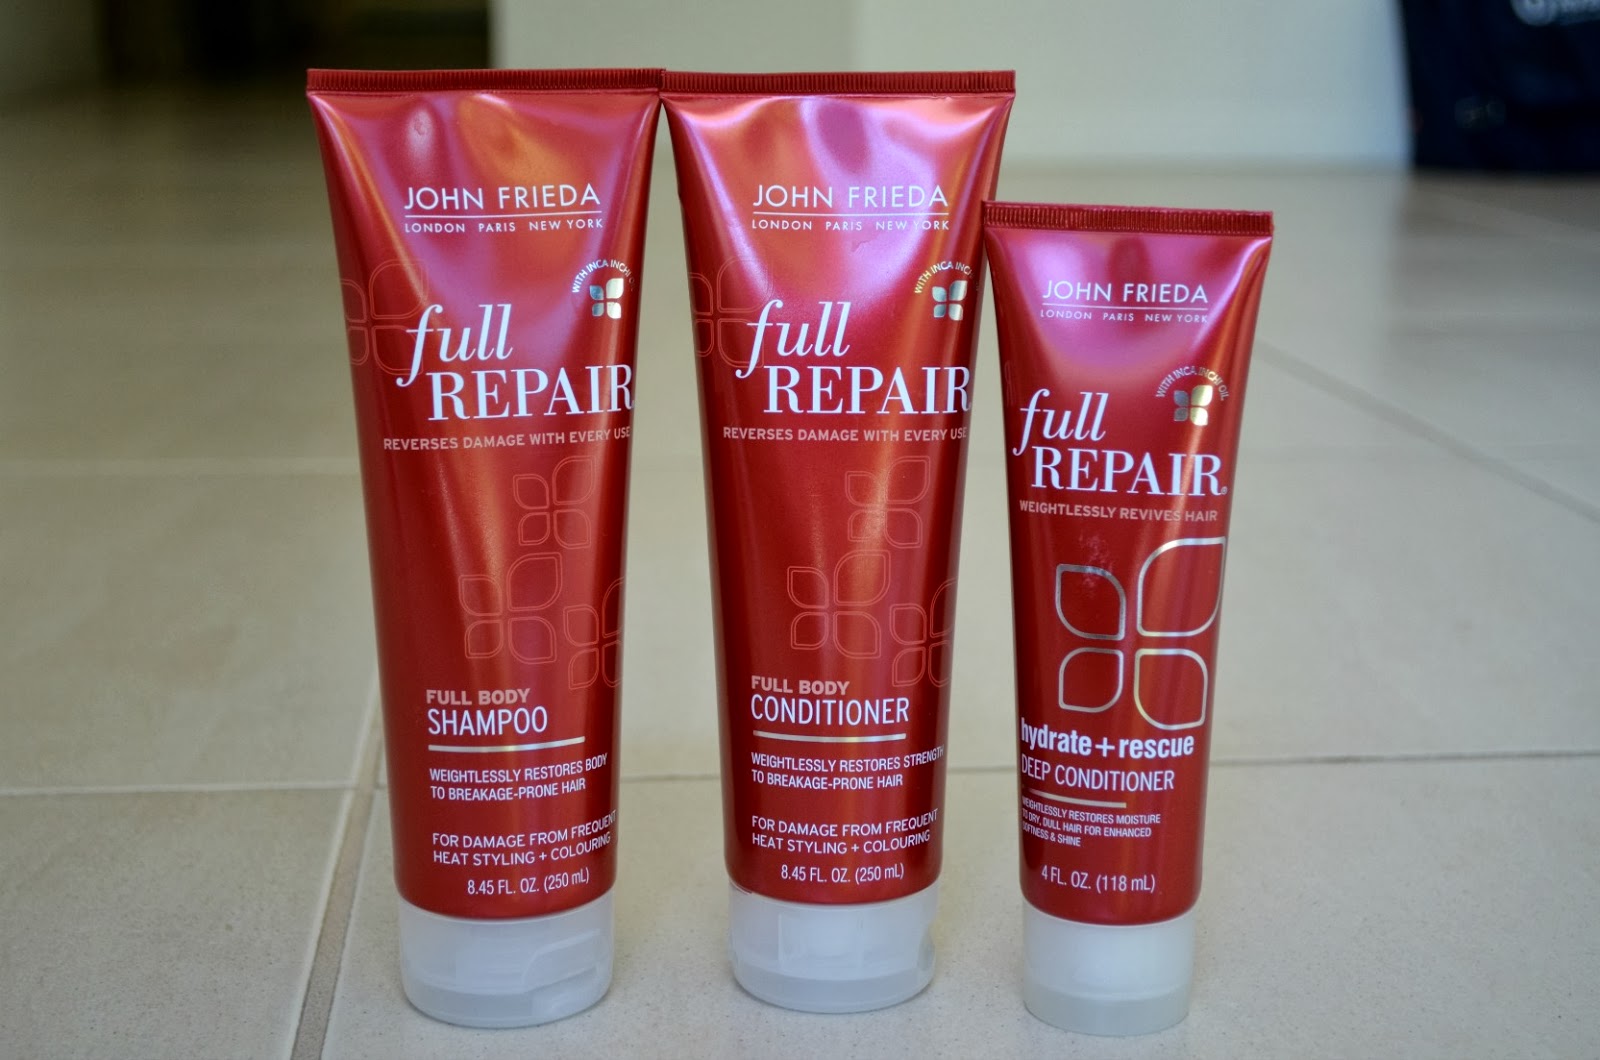
John Frieda Full Repair Shampoo, Conditioner and Deep Conditioner Review

It's been a really busy week and I'm really sorry I hadn't been able to write a post for Wednesday like I normally do. I'm afraid this is going to be the case for the next month or so. I have exams coming up and after that I'll be going overseas (on holiday). So please bear with me! I promise I do have some awesome tutorials planned, they just require a lot of time to make so they won't be up on this blog anytime soon. And yes, this also means that majority of my posts for the next month will be mainly reviews.

So, until I return from my trip around mid December, I'll only schedule posts for once a week. But after that, it'll be back to the normal schedule of twice a week (Wed and Sat). I also promise I will make it up to you guys. *hint hint* Giveaway to come! 

Anyway, let's dive into this review!


John Frieda Full Repair Full Body Shampoo
Claims: "Targets short, broken hairs, flyaways, and damaged ends. The shampoo is formulated with inca inchi oil, a micro-oil rich in Omega-3, which penetrates dry, damaged hair and repairs the look and feel of overworked hair."
RRP: AUD15.99
Packaging: 5 out of 5

John Frieda Full Repair Full Body Conditioner
Claims: "Penetrates dry, damaged hair and smoothes and detangles hair, reducing the risk of breakage."
RRP: AUD15.99
Packaging: 5 out of 5

John Frieda Full Repair Hydrate + Rescue Deep Conditioner 
Claims:  "Infuses the hair with moisture to improve the look and feel of damaged hair.The conditioner deeply replenishes and restores softness and shine, targeting hair in its most damaged areas."
RRP: AUD16.99
Packaging: 5 out of 5

Review: My hair has been feeling a bit dry lately. Perhaps it's due to the change in weather but it's really unhappy. I rarely get breakage and split-ends up they've suddenly popped up. I keep trimming them off for "damage control" but I know that I'd need a more long-term solution. Introducing...! Nah, I better stop sounding like an advert. So, I was sent the Full Repair range to try out. Although I have yet to see a reduction in breakage and split-ends, I do have positive findings to report.

Most hydration/repair type of hair care products weigh the hair down so we tend to lose body and volume as a compromise for soft silky strands. With this trio, I noticed that volume is retained and it adds moisture back into my hair. This is particularly true with the Deep Conditioner. I love how soft my hair feels after using it. All three products have similar scents. I'm happy to announce that it's pleasant and non-irritating to my sensitive nose. The formula is slightly "gel-like" and the shampoo lathers up relatively easily.

Word of warning, once you've used the Deep Conditioner, you'll find that the Conditioner is not as "powerful" in comparison and will be tempted to just stick to the Deep Conditioner. Too much of a good thing is never good, you should use it in moderation. Plus it'll be quite costly to use it as your everyday conditioner. Just make sure you cover all of your hair with Shampoo, not just your scalp. Rinse off. Apply Conditioner. WAIT for a minute. Rinse off. If you're in a hurry to wash the conditioner off, it will not get the chance to work its magic. I've been guilty of this crime before.

I hope that with continued use, the next time I post an updated review, my hair will be damage-free!

Do you suffer from split-ends and breakage like I do? Do share your hair woes!