Raving about makeup, skincare, hair and other little obsessions... A Beauty Blog

Saturday, December 13, 2014

Rimmel London Provocalips Review and Swatch


I was very kindly sent the Rimmel London Provocalips 16HR Kiss Proof Lip Colors to trial.

How it works

  • Two steps to this product. 
  • You can untwist the tube at both ends. There is a doe-foot applicator on each end. 
  • You apply the Step 1 Intense Colour first. Then you apply Step 2 Lock & Shine. 
  • Comes in a total of 8 colours. 
  • Tip: wait 30 seconds before applying Step 2 to allow Step 1 to set first. I find that the colour lasts longer that way. 

From top to bottom: 110 Dare to Pink, 700 Skinny Dipping, 200 I'll Call You, 310 Little Mix, 500 Kiss Me You Fool, 730 Make Your Move, 230 Kiss Fatal, 550 Play With Fire


My thoughts on the product

  • It is highly pigmented. 
  • There is no stickiness to the texture (like you get with lip glosses). 
  • Once it sets, it's basically touch dry. Hence their claim of it being "kiss proof". 
  • It will only come off when you eat or if you have dry flaking lips. Otherwise, it has excellent staying power. I've tested it up to 8 hours and only had to reapply once because I ate. 
  • It's neither hydrating nor drying. 
  • You'll have to use makeup remover to take this stuff off because a wipe ain't gonna do the trick. 
  • The recommended RRP is AUD17.95. Relatively affordable. Makes a great stocking filler this Christmas! 

Now here are photos of me with each lip colour on. I only applied one coat so that you judge how pigmented it is with one swipe. 

110 Dare to Pink - This is a pretty pale pink colour.


700 Skinny Dipping - This seems to be the perfect nude for me! What an apt name, it made my lips look naked.


200 I'll Call You- This is my least favourite colour of the lot. It's a standard safe pink colour. A bit boring for me.


310 Little Minx - I really like pinks that pop so this one was really right up my alley.


500 Kiss Me You Fool - Whoops! You can tell that I overdrew my lips (it was intentional)! Love the name. I'd like to wear this on a date and if my date wear to compliment me on my lip colour, I'd say "Thanks! It's called Kiss Me You Fool!"


730 Make Your Move - I absolutely love this colour! It has an "English rose" feel to it that I can't explain. I think it's an excellent all around colour. I think most people find it boring but I love this like I love Celestial from the Apocalips Lip Lacquer range.


230 Kiss Fatal - This is my first purple toned lip colour and I must admit that I really like it. It has a very grunge-y element it.


550 Play With Fire - This is a pretty standard dark red colour that will suit almost anyone. 


Have you tried Rimmel London's Provocalips 16HR Kiss Proof Lip Colour? If so, what are your thoughts? Even if you haven't, what are your expectations? 
Tuesday, November 4, 2014

Monolid Eye Makeup Tutorial

It's finally here!! The long-awaited and promised monolid eye makeup tutorial! I'm really sorry it has taken me a whole year to get around to it!


A big thank you to one of my closest friends, best-est housemate and the most gorgeous monolided beauty I know, Ann-Marie, for being the model for this highly requested tutorial.


I really hope you enjoyed the tutorial. Now I shall proceed to bombarding you with lovely photos of Ann-Marie! 


If you have any requests, please feel free to leave a comment below.
Tuesday, August 26, 2014

Easy Spring Makeup Tutorial

It has been a very long time since I last posted. I've been away and sick a lot. I'm not going into this boring details. Let's jump straight into this Easy Spring Makeup Tutorial instead!


I filmed this a few months back. Yes, I did a spring look during autumn! Regardless, the weather is warming up now and I'm sure many of you are ready to swap your berry coloured makeup to those of orange or coral hues. A very good friend of mine, Mia, kindly volunteered to be my model for this tutorial. I would like to give a quick shout out to her. Thank you, Mia!


Product List
1. Urban Decay Primer Potion
2. Elizabeth Arden brown eye pencil*
3. MAC eyeshadow in Brown Down
4. MAC eyeshadow in Naked Lunch
5. Urban Decay eyeshadow in Virgin
6. Rimmel London Scandaleyes Eye Shadow Stick in Blackmail
7. Mirenesse mascara*
8. MAC lipstick in Morange
9. MAC blush in Dame

*unfortunately I don't have the exact name of the product


I really hope you enjoyed this Easy Spring Makeup Tutorial as much as we did making it! Keep your eyes peeled for the next tutorial. It's the long-awaited Monolid Eye Makeup Tutorial!!

What's your favourite lip colour to wear in spring? 
Sunday, July 27, 2014

Blog Sale: Shoes

Hey ladies, I'm selling three pairs of shoes for various reasons. They are all in good condition. All prices are in Australian dollars. They are all size 8. Please email me if you're interested: ty.blog.epi[at]gmail.com

1. Diana Ferrari heels: $40 + postage (original price $90)


2. Pink Forever New heels: $20 + postage (original price $80)


3. Grey Forever New heels: $30 + postage (original price $80)


Saturday, July 19, 2014

People for Plants Skin Care Review

I was sent some products from People for Plants a while back and I thought it's about time I reviewed it. There were 4 products and I've listed them in the order they are to be used/applied. I'm going to keep this short and sweet!


People for Plants Cleanser & Make Up Remover 
RRP: AUD24.95
Review: If you're after a gentle and organic cleanser, then this is the product you might want to try. It is extremely mildly scented so it does not irritate my sensitive nose. I usually use this with a muslin cloth to help scrub off my makeup. That way, I don't have to exfoliate with another product, cutting down the steps in my routine!


People for Plants Mist Toner 
RRP: AUD19.95
Review: Whenever I think of toner, the word "hydration" never comes to mind. This toner is very soothing and does not strip the skin at all. In fact, it claims to hydrate the skin. I use this my spray the product onto a cotton pad before swiping it over my skin. Alternatively, you can just mist it directly onto your face. This product is also very mildly but pleasantly scent.


People for Plants Face Oil 
RRP: AUD29.95
Review: Face oil! I've reviewed a few on my blog (you can read them here and here). This one is another excellent option. Perfect for moisturising the skin and regulating sebum production. I apply this a few seconds after the toner, really pressing it into my skin with my fingers.


People for Plants Hydration Gel 
RRP: $29.95 
Review: After 30 seconds or so, after the face oil has been sufficiently absorbed by my skin, I apply the hydration gel. This product glides on the skin smoothly and you do not need a lot to cover your entire face. Together with the face oil, I find that my skin stays moisturised throughout the day; no reapplication needed.

Overall these are really decent organic skin care products. Oh and let's not forget, they are Australian made! If you're after something really gentle for the skin, then I recommend this range. My only gripe is that the cleanser was too mild for me. Other than that, I think People for Plants is definitely worth considering when you next go shopping for skin care products!

Have you ever tried any People for Plants skin care products? What are your thoughts?
Wednesday, July 16, 2014

Winter Makeup Tutorial


I had intended for this post to be publish two Fridays ago. Unfortunately, I got caught up with uni and packing for a trip. And last week, I was away at a conference. It's been a whirlwind of fun, craziness and adventure.


We're right in the middle of winter now, here in the land down under. If you love the dark lip look for the cold season but are not ready to sport a deep burgundy, then go for this oxblood red. I think that this look is perfect for a night out with the ladies. So here it is, the long overdue video. I hope you enjoy it!


Would you wear this look? What's your favourite winter makeup look?
Wednesday, July 2, 2014

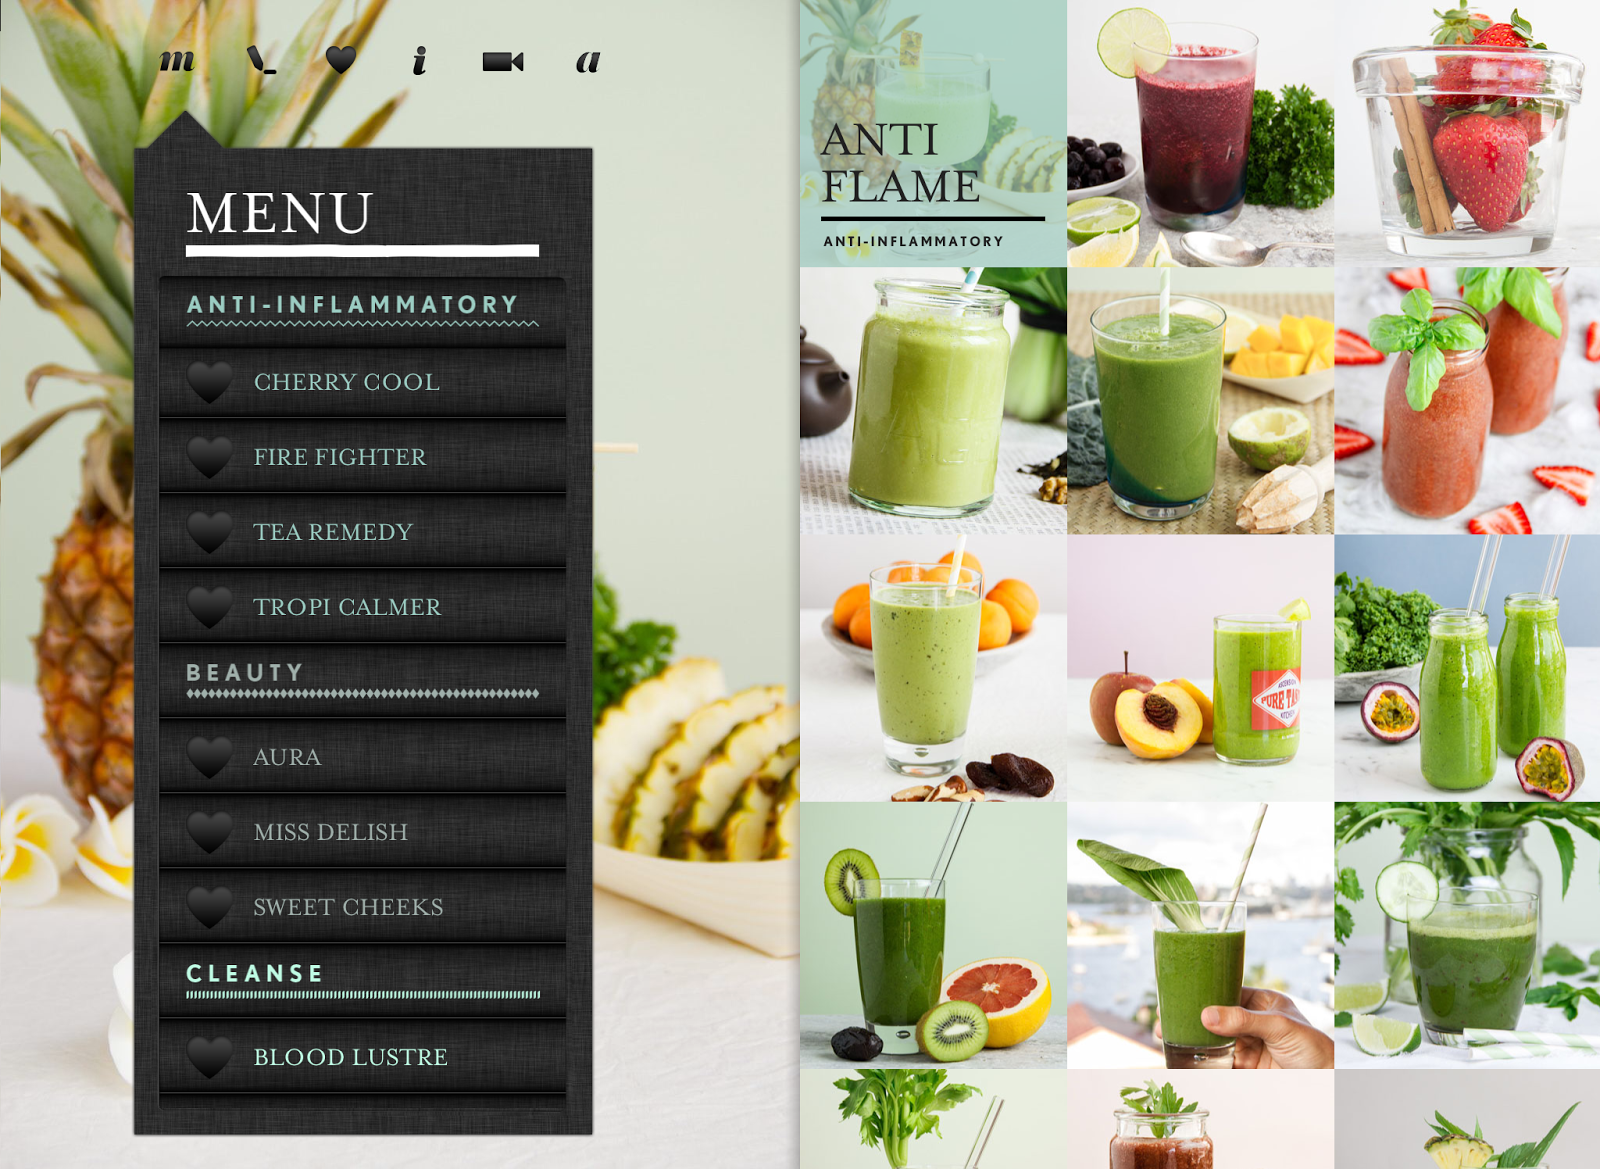
Green Smoothies - An App Review


When I offered the chance to try out an app filled with green smoothie recipes, I jumped at the chance. Let's face it, the green smoothie fad is not going to go away for a while. And that's okay because these green liquids are good for us!


Green Smoothies is an app created by Lauren Glucina from Ascension Kitchen. It is a collection of 30 healthy green juice recipes. It costs $3.79 to get it on iTunes. "Well, why can't I just Google for some free recipes and save myself $3.79?" you might ask. For one, I find that most websites only list 3 recipes at most. And even if they list 10, I find that most of them are not very exciting. Lauren uses an extensive range of ingredients, all of which are good for the body, to achieve a huge variety of flavours and benefits. From bok choy to passionfruit, you name it!


The app also contains a video on how to make "Kind Milk". Basically milk from a type of nut of your choice! I found it really fascinating and plan on giving it a go one day. Another cool feature is the Shopping List. You can select a recipe and add it to the Shopping List. That way, you can easily consult the list of ingredients that you need for a particular smoothie when you're out getting the groceries.


Recipe that I tried
Some of the ingredients
Tea Remedy I made
Yes, this all sounds exciting but what you if you don't own an iPad or an iPhone? Fear not, fair maiden! Lauren has got you covered. You can purchase the eBook version from her website. That's all I have to say about this neat little app. I haven't mentioned everything single thing that's in it because surprises are more fun! I'll leave the rest for you to judge if/when you try it out.


Are you fan of green smoothies? Do you have any tips on how to make green smoothies? Please do share!
Saturday, June 28, 2014

Easy Neutral Makeup Tutorial


It's been a while since I last posted a makeup tutorial on this blog. So finally, here's one for you to enjoy! And don't worry, I have a couple more lined up as well. Double hooray!


Before we jump into the tutorial, I just wanted to tell you about the inspiration behind this makeup look that I'll be showing you. I bought this beautiful white spring dress from Forever 21 when I was in Shanghai a couple of months back. At first, I wanted to do a Spring/Summer makeup tutorial. To me, that usually involves a lot of fun bright colours (that's just my opinion anyway)...


 However, I love this dress so much that I ended up doing a "more natural" look so that my makeup was not competing with the dress for attention. And so, the Easy Neutral Makeup Tutorial was born. So whether you're in the Northern or Southern Hemisphere, I've got you covered. This pretty flattering look works for all seasons.


I hope you enjoyed the tutorial. Please leave a comment if you have any requests or critique. All are welcomed!

Instagram
If you love sneaky peeks of up-coming posts, including tutorials, follow me on Instagram!
Wednesday, June 25, 2014

Philosophy The Microdelivery Triple-Acid Brightening Peel Review


Philosophy The Microdelivery Triple-Acid Brightening Peel
RRP: AUD95
Review: Philosophy is renowned for their skincare products. I've heard people swearing by their cleansers and moisturisers. I was given the privilege to trial one of Philosophy's luxurious products, the microdelivery triple-acid brightening peel. First of all, don't be deterred by the price tag and secondly, don't be scared by the sound of "triple-acid" (it sounds like too much, I know but I promise it isn't!).

What this product does is basically chemically exfoliate your skin, removing all the dead (dull) skin cells to reveal the beautiful (bright) cells underneath. My skin feels smooth after using it, as though it has been magically resurfaced. I promise you I am not exaggerating. This stuff is pretty freaking awesome! It makes my skin look radiant. From what I was able to observe the effect usually lasts a couple of days and disappears as the skin builds up more dead cells. But of course Day 1 always looks the best. This product also helps speed up the fading of acne marks, after all it is an exfoliant.


The peel comes in soaked pads. These circles of cloth are not abrasive at all. It feels soft as you swipe it across your skin. The pads are individually packed, which I think is very convenient from a traveler's perspective and hygienic in general.

I use this product once a week or less, as recommended in the instructions. I swipe the peel all over my face after cleansing and drying my face. Then, I let the product sit for a few minutes before I apply my moisturiser. I do this at night, letting the product do its work overnight. Come morning, my skin feels super smooth and soft, practically silk-like. This product does not sting my skin at all; however, if you have sensitive skin, you're told to rinse it off after a few minutes as opposed to leaving it on overnight. My advice is to lay off your other exfoliators leading up to when you plan on using this peel.

Overall, I love this product. Yes, it is expensive for $7.90 per pad. However! I believe that it is a really good investment. Instead of using it once a week you can reserve them for special occasions. I plan on getting my hands on more when I run out! I hope you found this review helpful.

On a side note, please keep your eyes peeled this weekend because a makeup tutorial post will go live on this blog!

Have you ever tried Philosophy The Microdelivery Triple-Acid Brightening Peel before? Please share your thoughts on the product! 
Monday, June 16, 2014

5 People Who Can Help You Improve Your Blog


In this day and age, getting noticed on the web is hard. I've put together a list of people who have helped or still are helping me make my blog better. Hopefully this list will help you improve your blog, increase your blog traffic and up your game.

1. Dana from Wonder Forest
If you've read my review on her e-book Blog Wonderful, then you'd know about her. She gives out really good tips on her blog as well. Although it's usually quite basic, it's particularly useful to novices.

2. Kate Muegel from Drop Dead Gorgeous Daily
Kate runs an e-course called Secret Bloggers Business. I'm currently taking it and I only have one word to describe it: amazing! I seriously thought I knew what I was doing with blogging but Kate proved me wrong. There's so much to learn! If you're really want to turn pro, I highly recommend you take this e-course.

3. Guy Kawasaki from Canva.com
Not only does Guy have a great sense of humour, he really knows his stuff when it comes to writing and social media! Like his Facebook page and you'll see lots of resources pop up on your news feed everyday. Keep an eye out for webinars that he runs with Peg Fitzpatrick about social media. I've watched one and it was quite enlightening!

4. Shameless Maya
Okay so she's a Youtuber, not a blogger. However, I find that a lot of bloggers these days are making Youtube videos for their blogs and vice versa! She has made a series of videos about photographer and video-making which I found helpful.

5. Your role model!
This is not specific at all but hear me out! I find that a blogger role model is important for inspiration and motivation. Whenever I look at a blog/blogger that I really admire, I say to myself, "Wow. This is really good. I want to do just as well or even better." And really, if you observe how your role model run their blog, you can pick up little tricks here and there to improve your own blog. It just takes a bit of exploring.

Here are some of my favourite big-time bloggers (in no particular order):


And for the record, I am not being compensated in any manner to mention the names above! I hope this post has been helpful. Good luck!


Do you know of any other persons who can help improve our blogs? Please do share in the comments.
Saturday, June 7, 2014

Pinterest, Monolid Makeup Tutorial, WHAT?!

I've done this a million times. I'm about to do it again... I apologise for not posting lately!

Okay, hear me out. I've had exams. I actually managed to schedule a couple of posts leading up to my exams. I thought to myself that I'd have time after exams to create posts. I'm been radio-silent since I finished my exams because I've busy. Yea, imagine that. Busier whilst on break than during exam time. WHAT?! 

If you're following me on Instagram, you'd realise how busy I've been. I caught up with some high school friends, showed a visiting aunt around the city, you name it. You might think, "Uh, that still does not take up 24 hours of the 9 days you have off." Well, I'm sorry guys but I'm exhausted. And yes, you heard me correctly! I do not get a month off uni like every other normal Australian student. I only get a week off! WHAT?!


Ty's Blog of Epiphanies on Pinterest
An announcement that I'd like to make: I'm now on Pinterest! WHAT?! Didn't I already have Pinterest ages ago? Yes but that was my personal account. This one is specifically and officially for Ty's Blog of Epiphanies! 


Liu Wen, monolided beauty; source: theplace2.ru
Lastly, I'd like to make a quick mention of my, uh, "upcoming" Monolid Makeup Tutorial. I still haven't filmed it yet. WHAT?! Hear me out first. I don't want to be one of those girls who does a MONOLID Eye Makeup TUTORIAL on someone with double eyelids. I've seen way too many of those on the internet. My dear model/housemate, Ann-Marie, has a busy schedule. I have a pretty busy schedule too. On top of medical school, I'm currently running around like a headless chicken organising a charity ball that's happening in September. We've been having trouble finding common free time to sit down make the tutorial happen. And we do actually find common free time, we prefer to spend it relaxing. So I'm afraid my blogging has been taking the back seat. 

I'll be the first to tell you that I'm not perfect. I'm not going to pretend to be one of those people who are super busy and still have all their shit together. I'm busy and need to get my shit together but I still haven't. I promise you, I am trying and I will continue to try. I really don't want to let go of blogging. It's been my pride and joy. It's just that sometimes life gets in the way of blogging! 


Feel free to share some WHAT?! facts about yourself. How has your week been like? 
Saturday, May 24, 2014

How to Get Rid of or Prevent Ingrown Hairs

Ingrown hairs can be an annoyance. It's unsightly and I tried getting rid of a particularly big one with the methods suggested on blogs, WikiHow and other similar websites but to no avail. Eventually, it got infected and inflamed. It was a nightmare and I had to go to my GP for antibiotics. Moral of the story? Please go see your doctor. They can help you get rid of the ingrown hair safely and effectively.

In terms of preventing ingrown hairs, I've now found an easy sure-fire solution. I'll use plucking my eyebrows as an example. First I always disinfect my tweezers with some rubbing alcohol. After I'm done plucking my brows. I'd apply a small amount of Caron Bump eRaiser Medi Paste to the areas plucked. And ta-da! I'm done. I told you it's easy.


This product is specifically formulated to prevent and "get rid" of ingrown hairs. I'm trying to be careful with the term "get rid" because I've only tested this on small early ingrown hairs. I applied it when I first noticed the bump forming. And the very next day, I was able to see the that tiny hair has sprung out. Disaster was averted.

I also apply this to my armpits after epilating. The skin in those areas used to be bumpy with ingrown hairs. Now, it's completely smooth! Okay, I know I sound like an advertisement. No, I'm NOT being paid to write this post! I bought this product after reading some promising reviews and I'm just happy to report that this product actually does what it says on its packaging!


Don't be fooled by the name. It's a cream, not a paste. The product is a bit expensive; AUD16.75 for a tiny tube of 30mL but I promise you only need a small amount each time. A little bit goes a long way. Most importantly, this stuff really works. So for those of you ladies battling with ingrown hairs, I highly recommend you give this product a try.

If you're not interested in purchasing a product to prevent your ingrown hairs, apart from disinfecting your tweezers, try cleansing your skin before and after plucking. This will help prevent the hair follicle from getting clogged or infected.


Do you have any other tips on preventing ingrown hairs? Please do share!