I'm really sorry this is a bit late for my usual Wicked Wednesday post. As you can see (from the title) I am a bit stuck on post ideas. So any suggestion or request that you have is more than welcomed!! Plus, I'm really busy. I have a 1500 word report to finish by Friday. It may not seem like a lot but it's a really tough report and I have a presentation to do tomorrow on top of that.
Anyway, enough with the moaning and complaining. Let's get on with the 5 random facts!
Random Fact #1: I have a terrible habit of toucing my hair... constantly! I can't go 5 minutes without running my fingers through it or playing with it. I've been trying to correct myself for quite some time now and still am. My coursemates probably think that I'm the bimbo of our lot, seeing as we're meant to be the " elite group of nerds".
Random Fact #2: I don't shave or wax my legs... ever! I'm sure I've just widened quite a few pairs of eyes with this statement. I have few and rather fine hairs on my legs so there really hasn't been any need for me to shave or wax them off. My mum is really lucky. Her legs are practically hairless (well, that is not true but it appears so anyway). So I've inherited a bit of that. Though I must say that I have been considering waxing because I can see those hairs and peer pressure/society's expectation is starting to take its toll...
Random Fact #3: I'm sure I've mentioned this before; the first makeup item that I owned is a Bobbi Brown eyeshadow palette, at the age of 18. So I did not start wearing makeup until I was 18. I still love and use it.
Random Fact #4: I don't drink alcohol. It has many bad "side effects"/consequences. This will be a whole topic/post for another day. However, I do take a sip or two from my boyfriend's wine glass occasionally.
Random Fact #5: Despite having an obsession/infatuation with makeup, I do not wear it on most days. So you'll see me out and about bare faced. At most, I'd just wear a coat of mascara and a slick of lipgloss.
Care to share a random fact about yourself? I'd love to hear about it.
Bonus Random Fact: this blog is turning 4 soon! Keep your eyes peeled for a big giveaway!!
Wednesday, May 30, 2012
Sunday, May 27, 2012
University Surival Guide: Last Minute Study Tips for Exams
If you're a university student in Australia, chances are you only have a week left till Swot Vac (exam revision "vacation"). So you haven't been really studying this semester because life, Facebook, Youtube, Twitter, Instagram and Pinterest just got in the way. That's okay. We've all been there or are there. As part of my University Survival Guide, I've put together some last minute study tips (also known cramming tips) for you. I do not encourage you to keep doing this. My next post will be on tips for studying consistently and I will explain why then. But for now, on with the cramming!
You'll be getting a week of Swot Vac and two weeks of exam period (may vary between universities). Let's run with a bad case scenario: you have 5 exams to study for and they are not evenly spaced out. The pink week represents Swot Vac and the blue weeks represent exam period.

Here's how I'd study for these 5 papers.

What I do is start with the last paper and work my way to the first paper before working my way back to the last paper. On days where I put two subjects, I'd do them in that order. For example, for the 11/6, I would study subject B in the morning and early afternoon and then study subject A in the late afternoon and evening. I made 7/6 to 10/6 flexible because it depends on how difficult your subjects are. So you may choose to study the difficult subject for more days.
This is how I study. It may or may not work for you. It is a just ROUGH GUIDE. I cannot guarantee you a pass or flying colours with this method, after all you are cramming. It's up to you to do the studying.
Other tips
Do you have any last minute studying tips? Do share.
You'll be getting a week of Swot Vac and two weeks of exam period (may vary between universities). Let's run with a bad case scenario: you have 5 exams to study for and they are not evenly spaced out. The pink week represents Swot Vac and the blue weeks represent exam period.

Here's how I'd study for these 5 papers.

What I do is start with the last paper and work my way to the first paper before working my way back to the last paper. On days where I put two subjects, I'd do them in that order. For example, for the 11/6, I would study subject B in the morning and early afternoon and then study subject A in the late afternoon and evening. I made 7/6 to 10/6 flexible because it depends on how difficult your subjects are. So you may choose to study the difficult subject for more days.
This is how I study. It may or may not work for you. It is a just ROUGH GUIDE. I cannot guarantee you a pass or flying colours with this method, after all you are cramming. It's up to you to do the studying.
Other tips
- Get enough sleep every night. Your brain will process things when you sleep and you'll remember things better.
- If you have difficulty remembering something, write it out. You'll remember it better.
- This is optional: you can wear a perfume/fragrant essential oil (such as lavender) while studying and then wear that same perfume again on the day you sit for the exam. The scent will stimulate your memory. Assign a scent for each subject.
- Take small breaks, it'll keep you sane. Don't do anything that will keep you occupied for hours (such as playing computer games). Have a snack, do some stretches instead or relax your eyes by standing outdoors and looking around for a couple of minutes.
Do you have any last minute studying tips? Do share.
Saturday, May 26, 2012
I have been trying these facial wipes for a few months now. I don't wear makeup very often and only do so when I am in the mood for it. I use these wipes to remove my makeup on the bus on my way home at the end of the day. Mind you, I pretty much only wear mascara and tinted moisturiser on most "makeup days" so they are easy to remove. I find that these wipes can remove makeup better than my makeup remover + cotton pad. The tiny little bumps on the wipes really help "scrub" my mascara off. So it essentially takes me less than 5 minutes to wipe everything off my face. This is not to say that I have not tested this product with heavier makeup. It removes heavy makeup just as effectively but you'll need two as opposed to one wipe.
I really love that this product is perfume, alcohol, colour and oil free. Perfume and colour in particular can cause skin problems/allergies because most of the time, they are artificially made. These wipes really cleanse my face, leaving my skin feeling fresh and clean. It states that it hydrates as well. Although I have not felt the acclaimed hydrating properties, I must admit that these wipes are not drying at all. So this does not replace the need to moisturise.
For me, the packaging is of reasonable quality. However, I am not a big fan of the "tape-back cover top" because most of the time it's hard to seal it back perfectly. This means that the wipes can dry up easily. So far, I have been able to keep the wipes moist and working. What I did not like about this product, especially at the start, was that it was heavy and bulky and thus a pain to fit and carry around in my bag. The heaviness and bulkiness reduces as I use the wipes of course. Nevertheless, I have found a solution to combat this problem of mine. I took a clean and new zip-lock bag and designated it as my "portable wipes bag". So every "makeup day", I would put one new wipe into the zip-lock bag before popping it into my bag and leaving the house.
This product contains 25 wipes and normally retails for AUD$7.50. I got it for $5 around sale time so it was quite a bargain! Would I repurchase this? Yes, unless I discover something better. Unfortunately, I cannot confidently recommend this to everyone because I have read a few bad reviews on this product. There are people who feel a film of residue left on their skin after using these wipes. However, like I have mentioned before, there isn't a single product that is for everyone. So if you have normal skin (not dry or oily) that is not sensitive like I do, I think it's safe to say that this product will most probably work on you. Overall, I am happy with this product.
Summary
Do you use cleansing wipes? Which brand/type do you use? I'd love to hear your recommendations.
Triple S: Nivea Visage Daily Essentials Fragrance Free Facial Cleansing Wipes Review
 |
| Source: beautydirectory.com |
I really love that this product is perfume, alcohol, colour and oil free. Perfume and colour in particular can cause skin problems/allergies because most of the time, they are artificially made. These wipes really cleanse my face, leaving my skin feeling fresh and clean. It states that it hydrates as well. Although I have not felt the acclaimed hydrating properties, I must admit that these wipes are not drying at all. So this does not replace the need to moisturise.
For me, the packaging is of reasonable quality. However, I am not a big fan of the "tape-back cover top" because most of the time it's hard to seal it back perfectly. This means that the wipes can dry up easily. So far, I have been able to keep the wipes moist and working. What I did not like about this product, especially at the start, was that it was heavy and bulky and thus a pain to fit and carry around in my bag. The heaviness and bulkiness reduces as I use the wipes of course. Nevertheless, I have found a solution to combat this problem of mine. I took a clean and new zip-lock bag and designated it as my "portable wipes bag". So every "makeup day", I would put one new wipe into the zip-lock bag before popping it into my bag and leaving the house.
This product contains 25 wipes and normally retails for AUD$7.50. I got it for $5 around sale time so it was quite a bargain! Would I repurchase this? Yes, unless I discover something better. Unfortunately, I cannot confidently recommend this to everyone because I have read a few bad reviews on this product. There are people who feel a film of residue left on their skin after using these wipes. However, like I have mentioned before, there isn't a single product that is for everyone. So if you have normal skin (not dry or oily) that is not sensitive like I do, I think it's safe to say that this product will most probably work on you. Overall, I am happy with this product.
Summary
- Removes makeup quickly and effectively. Perfect for on-the-go.
- Perfume, alcohol, colour and oil free.
- Cleansing; not hydratingbut not drying either.
- Can dry up if not sealed back properly.
- Bulky and heavy, especially at the start. Carry individually in zip-lock bag by refilling everyday.
- Affordable and would repurchase.
Do you use cleansing wipes? Which brand/type do you use? I'd love to hear your recommendations.
Thursday, May 24, 2012
Hygiene & Makeup Go Hand in Hand
So I said I'd do a post on hygiene and makeup. As promised, here it is!
Hands
After having learnt about bacteria and hygiene in my previous post, this one is a given. Sanitise your hands or wash and dry them before you start applying any form of makeup.When applying product with a finger, opt for the fourth finger (the ring finger). It's been scientifically proven to be the cleanest finger because it is the least used finger.
Brushes
Wash your makeup brushes frequently (at least once a week) because bacteria can grow on the product left on the bristles. If you're going to use your brushes on someone else, best to wash it a day beforehand and let it air dry. After air drying your brushes, avoid leaving them out or you will have dust and bacteria landing on them (undoing the cleanliness). I normally remove dust from my brushes my dusting them off on the back of my hand and then quickly store them away in a drawer.
False Eyelashes
I find that these fine little hairs can trap dust and bacteria so don't leave them out. Keep them covered in the case that it came in. You'll be placing it so close to your eyes that dust and bacteria can transfer to your eyes easily.
Makeup
Don't share eye or lip makeup, especially mascaras. You may think that you or your friend are clean people but you will still have a certain amount of bacteria on you. The types of bacteria that you and your friend have are more than likely to be different. The last thing you want is to come across a "new bacteria" and be infected by it. If you want to know how to sanitise your makeup so that it can be used on others, watch this informative Youtube video by gossmakeupartist.
Summary
 |
| Source: makeupandbeauty.com |
Hands
After having learnt about bacteria and hygiene in my previous post, this one is a given. Sanitise your hands or wash and dry them before you start applying any form of makeup.When applying product with a finger, opt for the fourth finger (the ring finger). It's been scientifically proven to be the cleanest finger because it is the least used finger.
 |
| Source: beautyatskindeep.com |
Wash your makeup brushes frequently (at least once a week) because bacteria can grow on the product left on the bristles. If you're going to use your brushes on someone else, best to wash it a day beforehand and let it air dry. After air drying your brushes, avoid leaving them out or you will have dust and bacteria landing on them (undoing the cleanliness). I normally remove dust from my brushes my dusting them off on the back of my hand and then quickly store them away in a drawer.
 |
| Source: misscatlo.com |
I find that these fine little hairs can trap dust and bacteria so don't leave them out. Keep them covered in the case that it came in. You'll be placing it so close to your eyes that dust and bacteria can transfer to your eyes easily.
 |
| Source: glossandmagic.blogspot.com |
Don't share eye or lip makeup, especially mascaras. You may think that you or your friend are clean people but you will still have a certain amount of bacteria on you. The types of bacteria that you and your friend have are more than likely to be different. The last thing you want is to come across a "new bacteria" and be infected by it. If you want to know how to sanitise your makeup so that it can be used on others, watch this informative Youtube video by gossmakeupartist.
Summary
- Sanitise/wash and dry your hands before you start your makeup.
- Your fourth finger (ring finger) is the cleanest.
- Don't leave anything exposed to the air for long periods, dust and bacteria will land on them.
- Don't share eye or lip makeup. If you wish to, you must sanitise it first.
Wednesday, May 23, 2012
You'd be surprised to hear that a "small debate" over one of my friend's Facebook page was the inspiration for this blog post. My friend shared a photo on her wall. It was of a couple kissing and the accompanying text was something along the lines of kissing being more hygienic than handshakes. I commented that I agreed with the statement, saying that our hands have been everywhere, touching a lot of dirty things without even realising it. There were a number of other comments as well. One particular one stuck out to me. This girl commented immediately after me, contesting that kissing was less hygienic, with a 100% transfer of bacteria. She had a good point but it made me wonder if she is studying biological/medical science like I am.
Anyway,
to the main point: hand hygiene, how much do you know about it? We all
know that we should refrain from touching our faces with our hands
because we'd be transferring more bacteria on to it. However, how many
of us actually successfully reduce this pimple-inducing habit? Being in
public places and using public items don't our case either for we use
our hands a lot: keyboards and mice at uni computers, toilet door
handles, picking up stuff that we've dropped onto the ground. We don't
know how clean the previous few hundred people who have touched the
object were. Studies have shown that one of the main ways bacteria are
transferred is through our hands (this includes health care settings). On a side note, let's not forget that we don't go around kissing everyone and everything and that we secrete enzymes and anitbodies in our mouths to combat bacteria. So I still say it's more hygienic than handshakes.
I, for one, touch my face a lot, be it removing a strand of hair from my face, resting my forehead/cheek on my hand or covering my face in frustration. So I always have a hand sanitiser in my bag. I sanitise my hands after using a uni computer, before and after eating, before applying moisturiser/sunscreen on the bus. Even if you don't have a hand sanitiser, always wash your hands with soap; there's always a sink nearby. And please DON'T forget to dry your hands. Bacteria love moisture, they thrive in damp/wet environments (remember, life began with water). If you don't dry your hands, you're pretty much culturing bacteria on them.
I firmly believe in drying towels
straight after every use because a damp towel habours a lot of bacteria
as well. Imagine using a damp towel. You'd be increasing your chances of
face and body acne with all that bacteria rubbed all over you. All you
have to do is hang outside where there's lots of sunlight (don't bother
with the dryer), the UV rays do an excellent job of killing bacteria.
You may say that your towel gets dried anyway even if you don't dry it
under the sun. Well, that doesn't mean the bacteia evaporates with the
moisture. Don't forget to do the same for your hands towels too (except
you don't have to dry it after every use, just the next morning).
I hope you found my tips useful. If you already know all of this, great! I find that a lot of people don't. If you can't help but touch your face many times throughout the day, do your best to remember to use the back of your hands instead (because they don't come into contact with things as much). Lastly, I'd like to add that not all bacteria are evil pimple-inducing, illness-causing little buggers like the media portrays them to be. More than 90% of them are our friends, contributing to our immunity, ecosystem and various industries (think alcohol, food, cosmetics, biotech). My next post will be on hygiene and makeup.
Summary
Wicked Wednesday: Hygiene to Reduce Chances of Acne/Pimples
|
| Source: makeupandbeauty.com |
You'd be surprised to hear that a "small debate" over one of my friend's Facebook page was the inspiration for this blog post. My friend shared a photo on her wall. It was of a couple kissing and the accompanying text was something along the lines of kissing being more hygienic than handshakes. I commented that I agreed with the statement, saying that our hands have been everywhere, touching a lot of dirty things without even realising it. There were a number of other comments as well. One particular one stuck out to me. This girl commented immediately after me, contesting that kissing was less hygienic, with a 100% transfer of bacteria. She had a good point but it made me wonder if she is studying biological/medical science like I am.
 |
| Source: ladyspeak.com |
I, for one, touch my face a lot, be it removing a strand of hair from my face, resting my forehead/cheek on my hand or covering my face in frustration. So I always have a hand sanitiser in my bag. I sanitise my hands after using a uni computer, before and after eating, before applying moisturiser/sunscreen on the bus. Even if you don't have a hand sanitiser, always wash your hands with soap; there's always a sink nearby. And please DON'T forget to dry your hands. Bacteria love moisture, they thrive in damp/wet environments (remember, life began with water). If you don't dry your hands, you're pretty much culturing bacteria on them.
 |
| Source: meishifangzhi.en.made-in-china.com |
I hope you found my tips useful. If you already know all of this, great! I find that a lot of people don't. If you can't help but touch your face many times throughout the day, do your best to remember to use the back of your hands instead (because they don't come into contact with things as much). Lastly, I'd like to add that not all bacteria are evil pimple-inducing, illness-causing little buggers like the media portrays them to be. More than 90% of them are our friends, contributing to our immunity, ecosystem and various industries (think alcohol, food, cosmetics, biotech). My next post will be on hygiene and makeup.
Summary
- Cut down on the face-touching. If you must, try to use the back of your hands
- Have a sanitiser ready in your bag or wash your hands well and dry them.
- Dry your towels under the sun. Bacteria thrive in moist environments.
- Not all bacteria are bad!
Saturday, May 19, 2012

I received a deluxe sample of this product for entering in Estee Lauder's Challenge on Facebook. I've tried it out for a little over two weeks and have stopped using it. I will explain why in a minute. I was really excited to receive this sample because I thought I could finally get rid of my pimple scars rather quickly and achieve effortlessly radiant and even skin. Plus, for a really expensive product, I wanted to trial it first before I bought it. So here it is, my review for Estee Lauder's Idealist Even Skintone Illuminator.
It smells heavenly of grapefruit. If you looked at the ingredients list, you'd find a number of fruit extracts on it, especially citrus ones. Yes, Vitamin C plays a role in collagen production, etc, etc. However, my lecturer at uni believes that we're better off buying 1kg of oranges, apply the juice all over our faces and then eat the oranges. She says we'd be getting more Vitamin C to our skin than using some expensive beauty products that only has a small percentage of Vitamin C in it. And that really is the truth. However, that did not stop me from wanting the Even Skinton Illuminator to be a miracle product.
This product is a serum, so it is more fluid than moisturisers. I was told to apply this straight after cleansing my face and to apply moisturiser after it. I did as I was told, religiously applying it twice a day as instructed. It did brighten up my face but that's because it deposited what appears to be glitter particles on my skin, which reflected light. The lady at Estee Lauder said that it would take at least two weeks for me to see any difference and that it also varies between individuals.
After using it for a little more than two weeks, I studied my complexion and could not see any significant difference to my pimple scars. That's okay. What really peeved me was that my skin was reacting to it (at least I believe it was). My skin became the opposite of even, with many tiny little bumps appearing on my forehead, cheekbones and chin. It distressed me because my skin is normally quite smooth. I asked my boyfriend if he noticed any difference to my face. He said that the product definitely brightened my skin but at the same time he did notice the little bumps.
I've stopped using the Even Skintone Illuminator for a week now and the bumps are still there but not as many and as severe. I'm currently breaking out as well and am trying to combat that by going on "skin detox". This means drinking more water, eating less greasey food (no chips for me) and cutting my products down to a minimum (just cleanser and a simple moisturiser). Fingers crossed I can get my smooth skin back!
Overall, I think the concept is great but I think it cannot work for everyone, which is the case for most beauty products. Everyone's skin is unique and so no product will work the same for everyone. If you're one of the people who are really happy with this product, I'm happy for you. I wanted this product to be all the rave that it is/was but, unfortunately, this is not for me.
Summary
Triple S: Estee Lauder Idealist Even Skintone Illuminator Review

I received a deluxe sample of this product for entering in Estee Lauder's Challenge on Facebook. I've tried it out for a little over two weeks and have stopped using it. I will explain why in a minute. I was really excited to receive this sample because I thought I could finally get rid of my pimple scars rather quickly and achieve effortlessly radiant and even skin. Plus, for a really expensive product, I wanted to trial it first before I bought it. So here it is, my review for Estee Lauder's Idealist Even Skintone Illuminator.
It smells heavenly of grapefruit. If you looked at the ingredients list, you'd find a number of fruit extracts on it, especially citrus ones. Yes, Vitamin C plays a role in collagen production, etc, etc. However, my lecturer at uni believes that we're better off buying 1kg of oranges, apply the juice all over our faces and then eat the oranges. She says we'd be getting more Vitamin C to our skin than using some expensive beauty products that only has a small percentage of Vitamin C in it. And that really is the truth. However, that did not stop me from wanting the Even Skinton Illuminator to be a miracle product.
This product is a serum, so it is more fluid than moisturisers. I was told to apply this straight after cleansing my face and to apply moisturiser after it. I did as I was told, religiously applying it twice a day as instructed. It did brighten up my face but that's because it deposited what appears to be glitter particles on my skin, which reflected light. The lady at Estee Lauder said that it would take at least two weeks for me to see any difference and that it also varies between individuals.
After using it for a little more than two weeks, I studied my complexion and could not see any significant difference to my pimple scars. That's okay. What really peeved me was that my skin was reacting to it (at least I believe it was). My skin became the opposite of even, with many tiny little bumps appearing on my forehead, cheekbones and chin. It distressed me because my skin is normally quite smooth. I asked my boyfriend if he noticed any difference to my face. He said that the product definitely brightened my skin but at the same time he did notice the little bumps.
I've stopped using the Even Skintone Illuminator for a week now and the bumps are still there but not as many and as severe. I'm currently breaking out as well and am trying to combat that by going on "skin detox". This means drinking more water, eating less greasey food (no chips for me) and cutting my products down to a minimum (just cleanser and a simple moisturiser). Fingers crossed I can get my smooth skin back!
Overall, I think the concept is great but I think it cannot work for everyone, which is the case for most beauty products. Everyone's skin is unique and so no product will work the same for everyone. If you're one of the people who are really happy with this product, I'm happy for you. I wanted this product to be all the rave that it is/was but, unfortunately, this is not for me.
Summary
- Smells really nice, contains citrus fruit extracts.
- Apply after cleansing and follow by moisturiser.
- Brightens up the skin but have yet to see it remove pimple scars.
- Will not use it again because skin reacted badly.
- Doesn't work for everyone; not for me.
Wednesday, May 16, 2012
Wicked Wednesday: Whoops! Too Much Liner?
I finally bought myself an angled eyeliner brush (ecoTools) and a lash/brow brush (manicare). I've only ever used a slightly rounded eyeliner brush by Bobbi Brown and I have to say that it's hard to do the cat eye with it. Don't get me wrong, it's a good quality brush and I love it. So I tested out ecoTools' angled eyeliner brush, by wearing a cat eye look to work.

My colleague said she liked what I did with my eye makeup but I'm not so sure about my customers. They were probably cringing inside at the sight of me. I think I over did it. It didn't help that I was wearing a strong eye colour: Smog from Urban Decay's Naked Palette.

It's uneven, I know. I still need more practice! But I did have fun trying to achieve this look. I probably should have saved it for a night out instead of wearing it for work! Oh well, I just hope that my good customer service made up for it.

I have to say that I'm quite impressed with ecoTools. Not only is the brush affordable, it's of good quality too. It's feels soft to the touch but it's stiff enough to create some nifty eyeliner looks. The manicare's lash brush is alright. It separates my "mascara-ed" lashes but not as much as I want it to. I guess I still haven't quite gotten the hang of it.
I hope you enjoyed this post! Do you wear the cat eye to work? Do you think it's appropriate for work? Comment below and share your thoughts!
Saturday, May 12, 2012
Triple S: The Big Hair Trend
Really sorry about another late Sweet & Sassy Saturday post! I've been busy and with exams coming up, I'll be even busier! But fear not, I've already prepared some content/posts to schedule.
So I was playing around with my hair the other day and I was wondering why everyone's after big and voluminous hair at the moment. So I tried it out to see for myself.
As you can see, having volume in your hair, especially at the top part of the head really "lifts" your face up. Having your long hair fall so flat and close to the skull just makes you look older. It pulls your face down, making it look longer. Having volume, like in the photo on the right, makes you look younger and more lively. Do you agree?
Want voluminous hair? Here are a number of easy ways you can achieve it.
So I was playing around with my hair the other day and I was wondering why everyone's after big and voluminous hair at the moment. So I tried it out to see for myself.
 |
| Volume |
 |
| No Volume |
VS
As you can see, having volume in your hair, especially at the top part of the head really "lifts" your face up. Having your long hair fall so flat and close to the skull just makes you look older. It pulls your face down, making it look longer. Having volume, like in the photo on the right, makes you look younger and more lively. Do you agree?
Want voluminous hair? Here are a number of easy ways you can achieve it.
- Blow dry your hair in the opposite direction you want it to fall so that when you flip it back into place, it will not fall flat against your head easily.
- Backcomb or tease your hair, especially at the roots. After that, let your hair fall back into place and brush your hair out ever-so-lightly to smooth your hair out (instead of walking around with a birdnest on your head!).
- Hair powder/dust. They are the latest rave. I have yet to try one but according to Lilit, from Makeup and Macaroons, they are easy to use, cheap and work like a charm. To read her review, click here.
- This is my favourite trick by far because it's so simple. Just switch your parting! For example, during the day, I'd wear my parting on the right and come night time when I'm going out, I'd flip my hair over, creating a left parting and boom! You have bigger hair.
Wednesday, May 9, 2012
Wicked Wednesday: Best "Features"
Hey ladies, I thought I'd just do a really fun but slightly meaningless post on which celebs I think has the best __(insert feature)__! I'm also trying out a new post style/format. Let me know if you like it!
 First up, Best Hair Award goes to Disney actress, Katherine McNamara.
Aren't her cascading red locks just beautiful? Everytime I look at this photo, I just want to cry. I'm envious! Wish I could cut them off and attach them to my head. I guess the cheat's way of getting long gorgeous locks like this is to get hair extensions.

The Best Skin/Complexion Award goes to Odette Anable.
She's simply radiant. Oh what we wouldn't do to have skin like hers! I'd love to know what her secret is. Tip: drink plenty of water.

Odette is so pretty that I simply must add another photo of her. In case you've never heard of or seen her before, she's an actress. She plays Dr. Jessica Adams on House.
 Okay, this is a really odd one but the Best Lashes Award goes to Dreama Walker. Apart from masacara, I don't think Dreama is wearing any false lashes at all. Doesn't look like it anyway. I'd kill to have her lashes! Okay, maybe I wouldn't actually... but I'd do almost anything.On a side note, Dreama is an actress on Gossip Girl.
For us mere mortals, we'd need to coat on lost of mascara and put on some falsies to achieve this look. I love Clinique's High Impact Masacra, YSL's Shocking Mascara and MAC's False Lash #33.
All these photos were taken from Primped.com.au. Thank you for inspiring this blog post!
Who would you give Best Feature Awards to? Comment below, I'd love to know!
 First up, Best Hair Award goes to Disney actress, Katherine McNamara.
 Aren't her cascading red locks just beautiful? Everytime I look at this photo, I just want to cry. I'm envious! Wish I could cut them off and attach them to my head. I guess the cheat's way of getting long gorgeous locks like this is to get hair extensions.

The Best Skin/Complexion Award goes to Odette Anable.
She's simply radiant. Oh what we wouldn't do to have skin like hers! I'd love to know what her secret is. Tip: drink plenty of water.

Odette is so pretty that I simply must add another photo of her. In case you've never heard of or seen her before, she's an actress. She plays Dr. Jessica Adams on House.
 Okay, this is a really odd one but the Best Lashes Award goes to Dreama Walker. Apart from masacara, I don't think Dreama is wearing any false lashes at all. Doesn't look like it anyway. I'd kill to have her lashes! Okay, maybe I wouldn't actually... but I'd do almost anything.On a side note, Dreama is an actress on Gossip Girl.
 For us mere mortals, we'd need to coat on lost of mascara and put on some falsies to achieve this look. I love Clinique's High Impact Masacra, YSL's Shocking Mascara and MAC's False Lash #33.
All these photos were taken from Primped.com.au. Thank you for inspiring this blog post!
Who would you give Best Feature Awards to? Comment below, I'd love to know!
Sunday, May 6, 2012
Caption That Photo Contest: CLOSED
Hello everyone! Yes, you read the title right. I'm throwing another giveaway! Well, okay maybe it's more of a contest, but still! This time I've got a few Rimmel goodies that I'd like to give to you, my readers.

This time it's really simple. No fuss over filling out forms. You just have to leave a comment below! So what should/must you write in the comment? Well, please leave me your first name and email address so that I can contact you if you win. Now here comes the fun part! Include in your comment a witty/funny caption of the photo below. I love Angelina Jolie but this photo has too much "potential" to not use it.
Before you comment away, no contest are without rules. Please make sure you fulfill the following requirements:
1. You must follow my blog (via Google Friend Connect).
2. You must be an Australian resident.
3. You must be 18 or above (or have your parents/guardians consent if you are under 18).
4. You can enter as many times as you want as long as each entry is separate and unique.
5. Please don't forget to include your first name and email address in the comment!
Contest ends on 31st May 2012. The person who makes me laugh the hardest wins!
I can't wait to see what you guys come up with! Art & craft lovers, keep your eyes peeled. I will be giving away a craft pack soon!
Disclaimer: This is a NOT a sponsored contest.

This time it's really simple. No fuss over filling out forms. You just have to leave a comment below! So what should/must you write in the comment? Well, please leave me your first name and email address so that I can contact you if you win. Now here comes the fun part! Include in your comment a witty/funny caption of the photo below. I love Angelina Jolie but this photo has too much "potential" to not use it.
 |
| Source: theokayarms.com |
1. You must follow my blog (via Google Friend Connect).
2. You must be an Australian resident.
3. You must be 18 or above (or have your parents/guardians consent if you are under 18).
4. You can enter as many times as you want as long as each entry is separate and unique.
5. Please don't forget to include your first name and email address in the comment!
Contest ends on 31st May 2012. The person who makes me laugh the hardest wins!
I can't wait to see what you guys come up with! Art & craft lovers, keep your eyes peeled. I will be giving away a craft pack soon!
Disclaimer: This is a NOT a sponsored contest.
Saturday, May 5, 2012
Triple S: Dandraff Drama Part II, a Review
If you can recall my previous post on dandruff, you'd know that I'd been trying to fight it off for quite a number of months now. At that time, I only just started using Head & Shoulders Scalp Massage Cream for Anti-Dandruff Care. It's been almost a month now and it's about time I wrote a review for it.
I'm really glad I bought this. This stuff works. Not only does it get rid of dandruff, I no longer experience itchiness in my scalp! I can leave my hair unwashed for three, sometimes four, days without getting "itchy attacks" and my hair would just be slightly greasey from the accumulation of hair oils. This is a good thing for me because I'm really busy, having to get to uni early in the morning and coming home late, I don't have a lot of time or opportunity to wash my hair (unless I wake up 4am, which I am not willing to do so). So now, I just wash my hair twice a week. You might think "Eew, gross!" but it's actually not that bad. My hair just gets nourished with its natural oils for longer. Even the lovely Zoe Foster only washes her hair once every three days.
So how do I use this Scalp Massage Cream? Easy. After having shampooed and conditioned my hair, I just scoop some up with the tips of my fingers and massage it onto my scalp. Massage your scalp for at least one full minute before rinsing it off. When I'm in a hurry, I just massage the cream into my scalp (no longer for a full minute) after shampooing and let it sit instead, while I apply conditioner to the lengths and tips of my hair. Tip: to retain moisture in your scalp and hair (plus make your hair shinier), rinse your hair with cold water.
The plastic tub is really sturdy. I dropped it once or twice and it's still very much intact. However, I don't recommend dropping or throwing it around for fun! The lid feels "flimsier" than the tub and will be the first thing to break. Another plus to this product is that it's very affordable; the RRP is $10.99. So overall, I'm very happy with this product. I've bade my dandruff farewell and hope to never see it again!
Summary
 |
| Source: beautydirectory.com |
I'm really glad I bought this. This stuff works. Not only does it get rid of dandruff, I no longer experience itchiness in my scalp! I can leave my hair unwashed for three, sometimes four, days without getting "itchy attacks" and my hair would just be slightly greasey from the accumulation of hair oils. This is a good thing for me because I'm really busy, having to get to uni early in the morning and coming home late, I don't have a lot of time or opportunity to wash my hair (unless I wake up 4am, which I am not willing to do so). So now, I just wash my hair twice a week. You might think "Eew, gross!" but it's actually not that bad. My hair just gets nourished with its natural oils for longer. Even the lovely Zoe Foster only washes her hair once every three days.
So how do I use this Scalp Massage Cream? Easy. After having shampooed and conditioned my hair, I just scoop some up with the tips of my fingers and massage it onto my scalp. Massage your scalp for at least one full minute before rinsing it off. When I'm in a hurry, I just massage the cream into my scalp (no longer for a full minute) after shampooing and let it sit instead, while I apply conditioner to the lengths and tips of my hair. Tip: to retain moisture in your scalp and hair (plus make your hair shinier), rinse your hair with cold water.
The plastic tub is really sturdy. I dropped it once or twice and it's still very much intact. However, I don't recommend dropping or throwing it around for fun! The lid feels "flimsier" than the tub and will be the first thing to break. Another plus to this product is that it's very affordable; the RRP is $10.99. So overall, I'm very happy with this product. I've bade my dandruff farewell and hope to never see it again!
Summary
- Head & Shoulders Scalp Massage Cream for Anti-Dandruff Care gets rid of dandruff and itchiness.
- Scoop some up with finger tips and massage into scalp for 1 minute.
- Packaging is good and sturdy.
- Very affordable. RRP: $10.99.
Wednesday, May 2, 2012
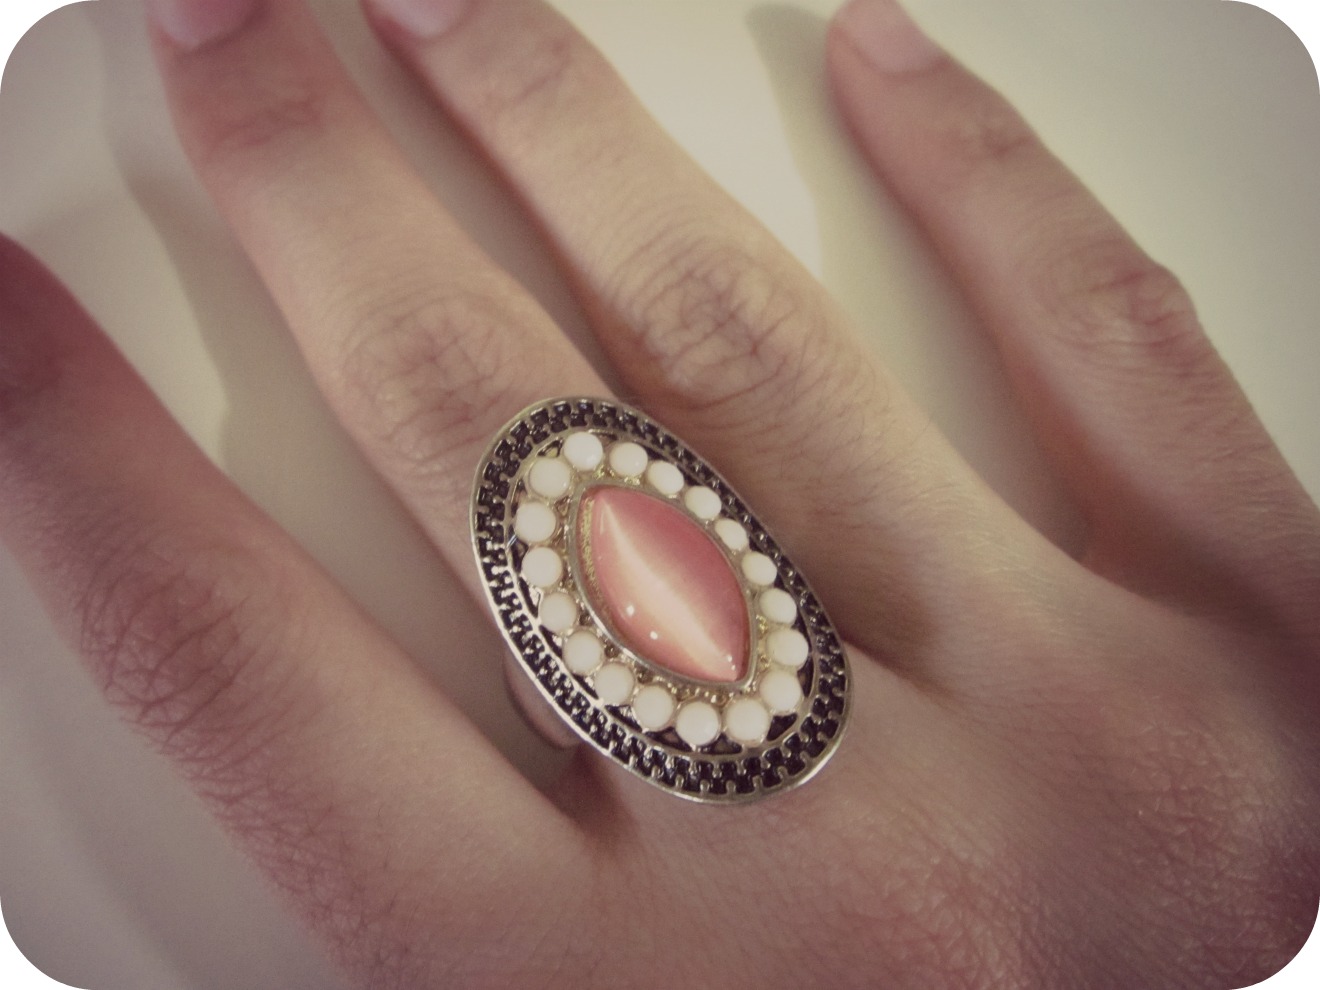
Wicked Wednesday: Ring Cheater
Bought a beautiful chunky ring that's too big for any of your fingers? I did exactly that a few of months back and has since found a way to wear it without having it slip or fly out of my finger. So don't throw it away or give it away just yet. You might just be able to wear your lovely ring by following these steps!

1. Take a cotton square, fold it once or twice, depending on how thick you need it to be.
2. Cut off the corners or cut your cotton square into a shape that fits the back of the ring.
3. Stick a double-sided tape onto the back of the ring and press your cotton square on top of it. Stick tape in between layers of the cotton if needed.
4. Put the ring on your finger. Test it out by having your arms by your sides and fingers pointing straight down to the ground. Your ring should not slip out.
5. If ring slips, add more cotton layers until it doesn't.
6. If the ring becomes too tight, press the cotton down hard against the back of the ring before wearing to flatten it a bit.

If any cotton bits are sticking out, just tuck it in with your finger. Others can only see the cotton if they look at your ring from the angle that I've shown in the photo above.

Everyone will think that you have a really fabulous ring on!

1. Take a cotton square, fold it once or twice, depending on how thick you need it to be.
2. Cut off the corners or cut your cotton square into a shape that fits the back of the ring.
3. Stick a double-sided tape onto the back of the ring and press your cotton square on top of it. Stick tape in between layers of the cotton if needed.
4. Put the ring on your finger. Test it out by having your arms by your sides and fingers pointing straight down to the ground. Your ring should not slip out.
5. If ring slips, add more cotton layers until it doesn't.
6. If the ring becomes too tight, press the cotton down hard against the back of the ring before wearing to flatten it a bit.

If any cotton bits are sticking out, just tuck it in with your finger. Others can only see the cotton if they look at your ring from the angle that I've shown in the photo above.
Everyone will think that you have a really fabulous ring on!
Subscribe to:
Posts (Atom)