 |
| dropdeadgorgeousdaily.com |
First, you need an old tank top/singlet (preferably of a stretchy material) and a pair of sewing scissors. A friend gave me this blue top and it is one size too large for me, so I thought this would be the perfect way to make it fun and wearable.
Step 1. Hang your top up against a flat surface so that it is easier to work with.
Step 2. Grab your scissors and start snipping away! You want to make the bottom half of your top into a fringe. I find the easiest way is to start with the middle, cutting the bottom half of your top into half. Then, take one side and halve it again. Keep halving the strips until you get them to a width that you like. The smaller the strips, the more knots per row.
Here's one way to do it. Grab a thick strip, fold it down or away from you into half. With two/three fingers holding the ends (to keep it as a fold), insert one scissor leg into the slit/hole and cut upwards.
When you're done cutting and snipping, you will end up with a fringe top.
Step 3. Now, become sailors and make some knots! Grab two strips that are adjacent to each other and loop it. Then bring the tail behind and pull it up through the loop to make your knot. Keep doing this until all of the strands are knotted: there you have your first row.
Step 4. When starting the second row, make sure you grab two strands, each coming from a different knot (but that are next to each other). Repeat Step 3 to make your second row.
Step 5. You may tug at the knots to make the top looser if it is starting to get tight and narrow. Repeats Step 3 and 4 to get the third and fourth rows.
Step 6. I got tired of standing to at around the third row, I moved to a table and chair. I lay the top down on the table and continued knotting (yes, it can be done!). I did up to 6 rows but I should have stopped at 4 like the creator did. Why? Because the fit was so tight that I could barely put my head through to start with. My advise is, don't pull your knots so high and tight, it'll be easier to wear.
Step 7. When you are done with your last row, cut off the tails.
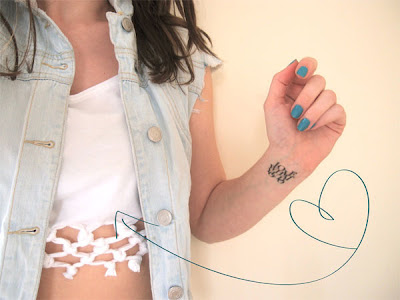
There you have it, your very own handmade Knotted Crop Top. I took a photo of it before I tried it on. Like I said, it was a struggle to put the top on because of the narrowing. I ended up cutting away one row. Below is a close-up of the knotted design.
What do you think? Will you give this a go?


Nice to see realistic version of my post on DDGDaily Ty. I have found this on http://www.clonesnclowns.com/2012/04/13/diy-cut-tie-knotted-crop-top-tee-shirt-brassiere-customise/
ReplyDeleteand work out the steps from pictures.
But I must say you did very well. your design looks even better then original. ;) love your tutorials keep it up.. Cheers!
Oh, I didn't realise it was you who posted it! Thank you so much for finding the original tutorial and sharing it on DDGD! :) And thanks, I'm glad you like it!
Deleteaaaah it's look better now :)
ReplyDeletelove it
thanks for your DIY really helpful dear
xoxoxo
You're welcome! :) I'm glad you like it.
DeleteI wonder if it would have looked good with the tails still on :) I definitely want to try this!
ReplyDeleteYou should definitely give it a try! Let me know how it goes with the tails on. :)
Delete