Raving about makeup, skincare, hair and other little obsessions... A Beauty Blog
Wednesday, September 28, 2011
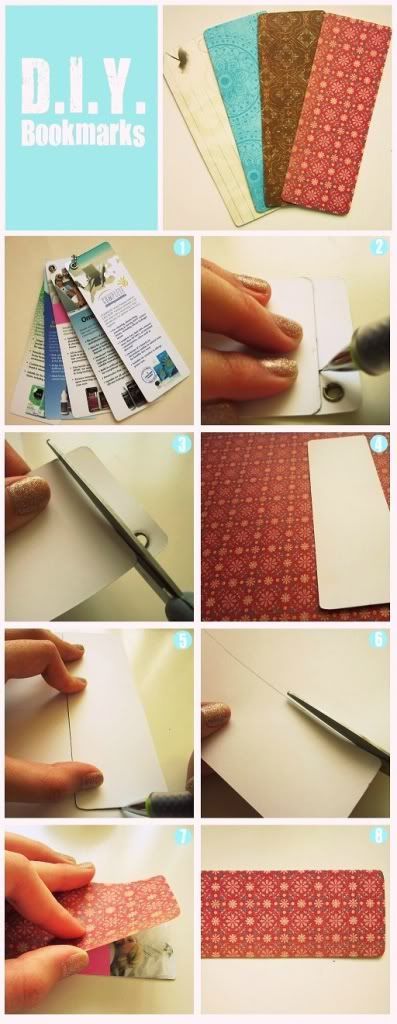
A couple of weeks ago, my dad handed me a few of his optical seminar freebies, this included a hand sanitiser (which I was happy to receive), a writing pad and a set of mini cardboard laminated pamphlets (I'm not sure if there exists a word to describe the thing). Anyway, my dad suggested that I use them as bookmarks. A dose of inspiration hit me. I decided that if I was going to use them as bookmarks, I might as well make them pretty ones!
Here's how I did it:
1. Remove the chain and separate them out. (Duh! Well, I just had to match the photo with a step)
2. Flip the "bookmark" over and use the end of another one to trace out it's "end shape". Do it just below the metal eye because you want to get rid of it.
3. With a pair of scissors, cut the "bookmark" following the line that you have just traced. This removes the metal eye and you're left with a rectangle "bookmark" that has rounded corners.
4. Select a card stock with the design/pattern/colour that you want on your "bookmark".
5. Flip your card stock over and lay your "bookmark" over it, faced down as well. Trace the shape of the "bookmark" onto the card stock. Tip: align the bookmark with the corner of the card stock so that there's less tracing and cutting to do.
6. Cut the shape out from the card stock.
7. Line the top side of your "bookmark" (the side with the advertising) with double-sided tape. You may use a glue stick but I find that they are not adhesive enough. They are many other types of glue that work as well. Align the cut-out and the "bookmark" at one end and then slowly smooth it down (just like how you would stick a protective film on your smart phone). It should fit perfectly... assuming that you did everything perfectly.
8. For me I didn't do it perfectly, so I had had to trim the edges a little afterwards. But that's no biggie. So voila! A pretty bookmark!
As you can see I made a few. I gave one to my mum and one to my dad. I did this a few days ago and yesterday, I made two more but I can't be bothered to take another picture and post it up here. After all, you get the picture already (excuse the lame pun). Enjoy!
Do It Yourself: Bookmarks
A couple of weeks ago, my dad handed me a few of his optical seminar freebies, this included a hand sanitiser (which I was happy to receive), a writing pad and a set of mini cardboard laminated pamphlets (I'm not sure if there exists a word to describe the thing). Anyway, my dad suggested that I use them as bookmarks. A dose of inspiration hit me. I decided that if I was going to use them as bookmarks, I might as well make them pretty ones!
Here's how I did it:
1. Remove the chain and separate them out. (Duh! Well, I just had to match the photo with a step)
2. Flip the "bookmark" over and use the end of another one to trace out it's "end shape". Do it just below the metal eye because you want to get rid of it.
3. With a pair of scissors, cut the "bookmark" following the line that you have just traced. This removes the metal eye and you're left with a rectangle "bookmark" that has rounded corners.
4. Select a card stock with the design/pattern/colour that you want on your "bookmark".
5. Flip your card stock over and lay your "bookmark" over it, faced down as well. Trace the shape of the "bookmark" onto the card stock. Tip: align the bookmark with the corner of the card stock so that there's less tracing and cutting to do.
6. Cut the shape out from the card stock.
7. Line the top side of your "bookmark" (the side with the advertising) with double-sided tape. You may use a glue stick but I find that they are not adhesive enough. They are many other types of glue that work as well. Align the cut-out and the "bookmark" at one end and then slowly smooth it down (just like how you would stick a protective film on your smart phone). It should fit perfectly... assuming that you did everything perfectly.
8. For me I didn't do it perfectly, so I had had to trim the edges a little afterwards. But that's no biggie. So voila! A pretty bookmark!
As you can see I made a few. I gave one to my mum and one to my dad. I did this a few days ago and yesterday, I made two more but I can't be bothered to take another picture and post it up here. After all, you get the picture already (excuse the lame pun). Enjoy!
Subscribe to:
Post Comments (Atom)

No comments:
Post a Comment