Raving about makeup, skincare, hair and other little obsessions... A Beauty Blog

Showing posts with label Nails. Show all posts
Saturday, April 5, 2014

Review: Fuse Gelnamel

Left to right: E-MOTION, V-AMP, SONIC BLUE-M
Fuse Gelnamel Starter Kit
RRP: AUD49.99
Packaging: 5 out of 5

Fuse Gelnamel (single)
RRP: $14.99
Packaging: 5 out of 5

I was sent a generous package from Fuse to try their gelnamel kit. And here's my thoughts on the products!
I can sum this all up in one word for you: wow! I'd never tried gel manicures before and this really impressed me. Yes, the process is in a way more tedious but trust me, the result is worth the steps taken. I won't go into the details of how you use the products. I was going to do step-by-step photos but Chloe Morello uploaded an excellent video a while back so I'm not going to let a good resource go to waste!

The brushes that come with the polish have short bristles, which I found made it a lot easier to coat my nails; I felt more in control of where I was applying the polish. You have to be careful to not apply too thick a coat or on your skin because you will feel like your finger is being cooked when you place it under the LED lamp. I like that they use LED instead of UV, which I believe is a health hazard. Most importantly, I love how quickly the polish dries! If you thought the OPI Drip Dry sped things up, this is even faster. All it takes is 30 seconds per nail and it comes out DRY so there's no way you can smudge it!


My favourite colour is V-AMP. It's a beautiful dark reddish purple. It's the perfect colour for autumn and winter. The finish may look dull initially but it gradually turns glossy. I had never done such a fabulous looking manicure before. I am not trying to be arrogant be, I am trying to praise Fuse! Although there are a few steps, they've made it very easy to understand and simple to do, plus they've left very little room for errors. Depending on your technique, the nail may come out uneven. It just takes practice to make sure you coats are always even. I also have not experienced any bubbling with this polish.

The polish generally lasts me a good five days before any chipping happens, which is more than I can ask for because A. I hardly ever wear nail polish for more than 5 days and B. my nail polish sometimes chips within 4 days. I love how my nails are left in good condition after I've removed the polish. There's no discolouration or peeling of my nails. Speaking of removal...


Sensationail Gel Polish Removal Kit 
RRP: AUD24.99
Packaging: 5 out of 5

From the same company, I was sent a gel polish removal kit. I will not say much about this because frankly I don't find it effective at removing the gel polish efficiently. I seem to have more success picking at the polish and gently peeling it off with my own nails. I probably shouldn't be admitting this but my nails are left in good condition, which shows how great the gel polishes are! I find that soaking my nails in the acetone provided did not speed up the removal process at all. In fact, I felt like it made the polish stick to my nails. Perhaps I just need practice. I will keep you posted on this front.

The only down side of the Fuse gelnamels is that there aren't that many colours available... yet! I'm hoping they will release more these amazing gems soon! For more information, feel free to check out the Fuse and Sensational websites.


Have you ever tried gel polish before at home before? What do you think?
Saturday, November 2, 2013

Nail Colours for Summer

Hey ladies, just thought I'd do a quick post on what colours I've been wearing on my nails lately.


For my fingers, I've been using OPI's Alpine Snow. I noticed that white is in trend right now, especially now that our weather Down Under is warming up. I really like it because it makes your digits look clean and sophisticated.


For my toes, I've been wearing OPI's Do You Lilac It? Seriously. Do you? I know I do! Purple is my favourite colour and the best way to keep it on my digits is to go for lighter shades during the warmer seasons. Please excuse my ugly blister patches...


Lastly, I just want to make a quick mention of another two hero nail products. The base coat and top coat. Both by OPI (of course!). The base coat keeps my nails from being stained and protects my nails from being stripped and peeled. I notice this whenever I remove my nail polish and my nails seem to take forever to recover. Now, it's no longer a problem. The top coat keeps my nail polish on for longer and gives it a beautiful shine. It also does not cause streaking like my previous Cutex base + top coat. Tip: avoid buying those two-in-ones. Generaly rule of thumb is that base and top coats do two different things and so should be two different formulas.


What's your favourite nail polish colours for this Summer?
Saturday, October 19, 2013

OPI Drip Dry Review


OPI Drip Dry
Claims: "These lacquer drying drops touch dry nails in 60 seconds. OPI Drip Dry dries nails completely in five minutes."
RRP: AUD23.95
Packaging: 5 out of 5
Review: I hate the process of painting my nails. I'm impatient and sloppy. I usually get nail polish all over my fingers and have to painstakingly clean up with a cotton tip dipped in polish remover.  After waiting for half an hour for my nails to dry, I smudge the polish by accident. Then I have to start all over with that nail. Garh!! @#%^$!!

I recently received a bottle of OPI Drip Dry and I'm in love! This little magic potion guarantees that I don't smudge my nails by accident because it dries my manicure within 60 seconds! Literally! Okay, maybe it's not 100% dry... but it's touch dry. So still means no smudging. Yay! This product is very easy to use. After applying, your top coat, just squeeze one or two drops onto your nail.

I know you might say that it's very expensive for such a small bottle of product. Trust me, it'll last you quite a while because you're only using drops at a time. Okay, well what about fast-drying nail polish? Yes, there are plenty of those on the market but I find a lot of them gluggy. They'll either dry in "patches" or I still end up smudging my manicure because they don't dry fast enough.

Maybe I'm just being melodramatic but I seriously feel like this has been the life-changing product of the year for me! I'll definitely be buying a new bottle once this one runs out.


Do you struggling with at-home manicures like I do? Please do share! 

Sunday, February 17, 2013

Chinese New Year Nails Tutorial


Happy Chinese New Year, everyone! Did you know that CNY is celebrated for 15 days? It's Day 8 and I thought it is high time I show you what I did for my nails.


Before we begin, there are three main items that you need to gather: 
- a red nail polish
- a gold glitter polish
- a triangular sponge

The following items are optional:
- top/base coat
- nail polish remover
- cotton buds or a small brush


Step 1. Paint on your base coat if desired. Wait for it to dry. Paint on a layer of red nail polish. Apply a second coat if the first coat is not opaque enough. Leave your nails to completely dry (at least 15 minutes)

Step 2. Choose an edge from the triangular sponge and apply the gold glitter polish to that edge. 

Step 3. Press the sponge edge down onto the tips of your nail. Move your sponge up and down in a dabbing motion, pressing the glitter onto your nail.

Step 4. Dip your cotton bud or small brush into nail polish remover and clean up any mistakes around the edges of your nails.

Step 5. Apply a top coat if you want the glitter to stay on for longer.


There you have it! My CNY nails. It's not too late to start celebrating Chinese New Year. Get into the groove by sporting this nail design!

P.S. This nail design works for Christmas too!

What are you wearing on your nails this CNY?
Saturday, February 4, 2012

My First OPI: Bubble Bath


I told myself that I would not buy anymore nail polish. For a few months, I kept my promise. But then, I caved and bought the most popular and universally flatteringly OPI nail polish: Bubble Bath because I've been wanting it for a year now. This is my very first OPI nail polish!


OPI polishes are not cheap but I must say that this was worth my money. There was very little fuss in terms of application and it doesn't have that powerful horrid smell that some brands have. Bubble Bath is a beautiful soft neutral colour. It is nude beige mixed with a bit of pink. The best way is to apply two thin coats, waiting at least 15 minutes for the first coat to dry before applying the second. That's the general rule is you want your nail polish to dry quickly. It's not gluggy and the formula allows it to smooth itself out even on your nails.


I've been doing a lot of housework and so far, not even a single chip! And I didn't even put a top coat on. I am very impressed with OPI and look forward to buying my next nail polish from them!
Saturday, January 21, 2012

Missoni Nail Art


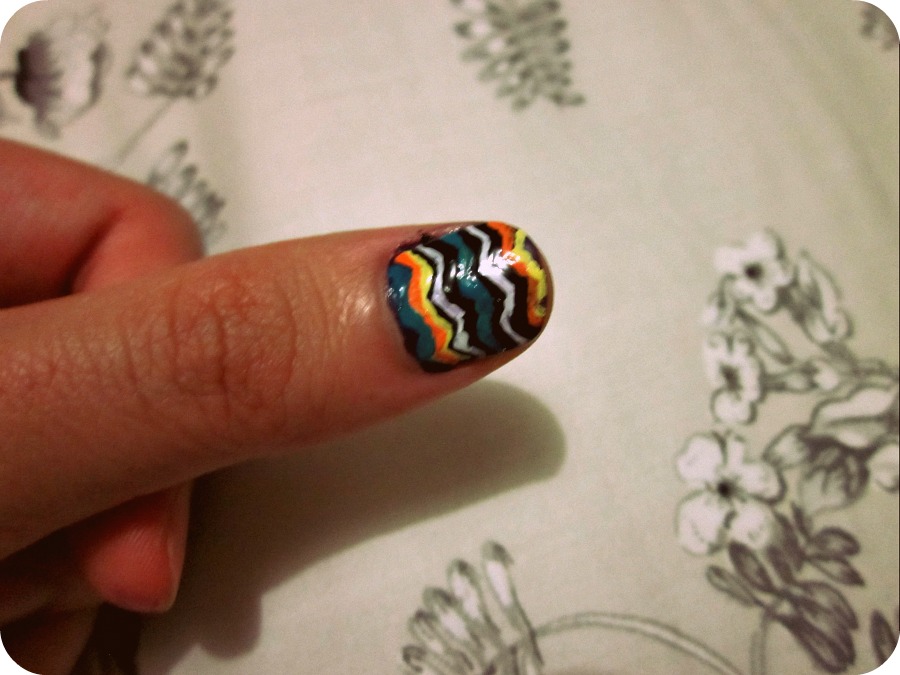
I was inspired by TBD's post on missoni nail art that I tried it out myself. I only did it on my thumb because I wasn't even sure I could pull it off. Plus, it's time consuming if you are meticulous, can't stand crooked lines and want to get it absolutely perfect.


Mine doesn't look all too good up close. But if I hold my thumb away far enough, it looks pretty cool. The fun thing about this is that the colours don't have to go in any specific order. You can change the colour order for different fingers. It's up to you which colours are to be repeated and which aren't. If your nail polish doesn't come with a fine tip brush, you'll need a small and thin paint brush.

Colours I used:
Dark purple (as the base)
Black (one with fine tip for nail art)
White
Bright orange
Bright yellow
Turquoise

Get creative! You don't have to stick with the colours I used. Google "Missoni" for some ideas. After having done it on my thumb, I feel like doing it to all my nails now. I should really be studying though! Enjoy.

P.S. If you have any questions, feel free to drop a comment and I'd be happy to answer it for you.

Songs for the post.
Thursday, September 29, 2011

Do It Yourself: Half-moon Nails

I know it's spring now (well, over here anyway) and I should be donning light, bright and fancy colours like pale blue (which is the "in" colour right now). But ever since I saw this tutorial on thebeautydepartment.com, I've been obssessed with trying to get my nails done that way. It's so cool you should try it too!

Follow the instructions and you should be able to "reproduce Lauren Conrad's nails"! I bought my transparent reinforcement stickers for about $6 from Officeworks, which works like a charm. As you can see, I haven't perfected the art yet. My hands are still unsteady when it comes to painting my nails in general. Going to need more practice!

I used a glittery gold from The Face Shop, which was given to me by a Korean friend, as the base. So don't ask me what the name of the nail polish is. It's in Korean. However, you should be able to find them in malls in Asia. Otherwise, there are plenty of other brands here in Australia that stock something similar. On top, I used Iris by Witchery. In the photo, it looks like navy but with the naked eye, it's a dark purple hue. My camera somehow picked it up as blue. It rhymes! Man, I sounded poetic! If you want other colour combination ideas. Check this out. And if you're feeling really glamorous and want to shake things up a bit, try this one, I dare you! Enjoy!


Coming up

Clinique vs. YSL
Who has the better mascara?

Grow It and Grow It Right!
Tips for growing and maintaining long hair.